Events
Events overview

|
Double clicking/tapping on a line brings you straight to editing the event. On small screens you have to choose each editable event-item separately in the bottomsheet menu.
Sort events by clicking on the header descriptions. On smaller screens select the filter-icon and choose on which field to sort.
Pulling down the list triggers a refresh of the whole list.
In the following paragraphs, we will go step-by-step through all the menu choices.
Details
|
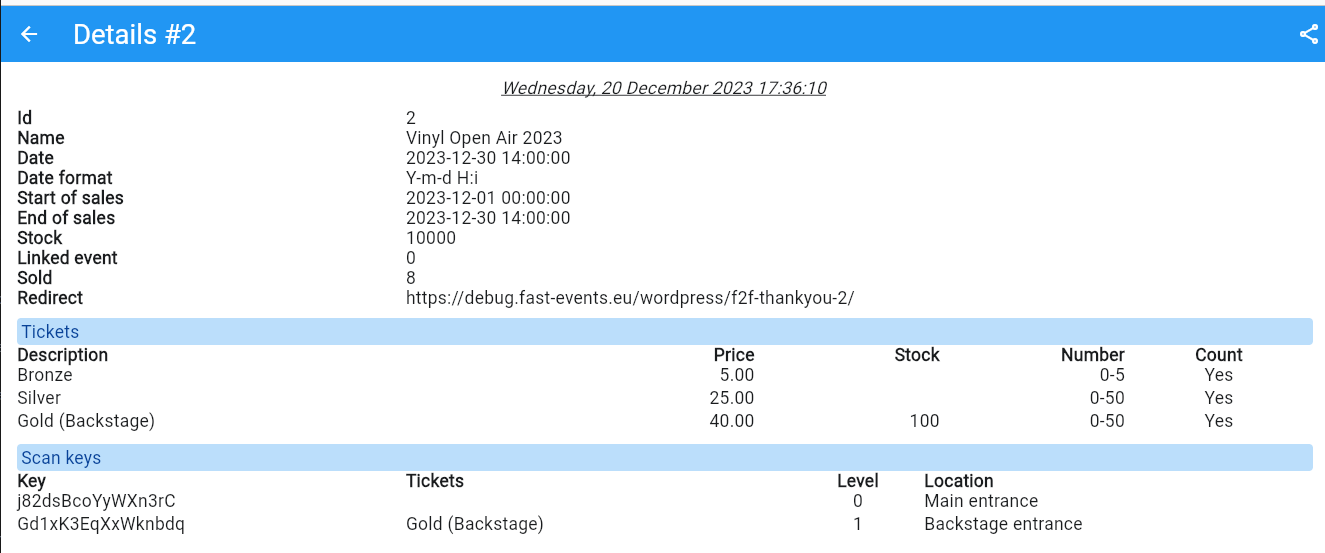
The menu choice Details gives you a fast snapshot overview how the event is configured. If needed share it by clicking/tapping the share-icon (top-right).
On small screens you have to tap the information-icon in the header of the bottomsheet.
Sync event
|
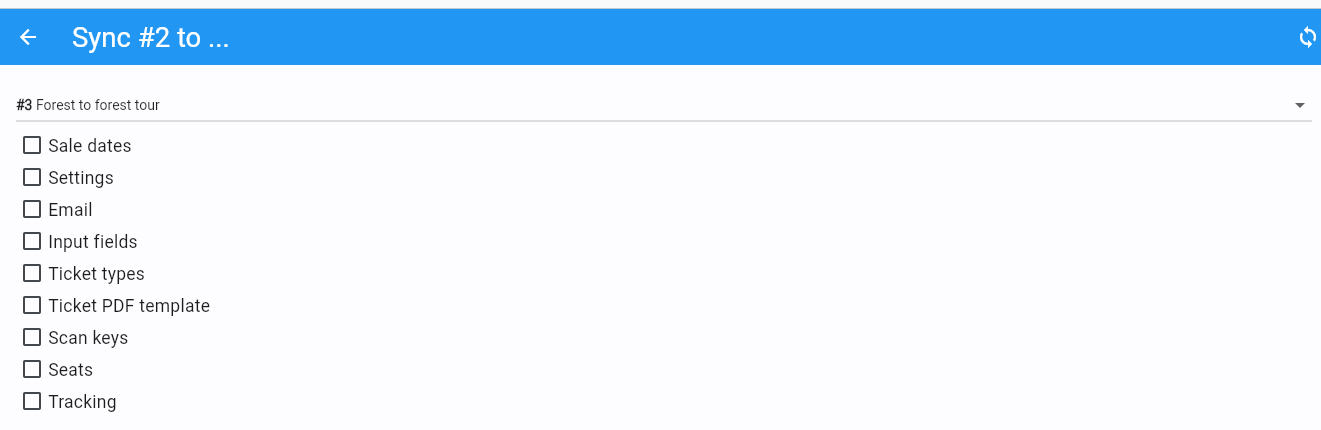
The menu choice Sync event can be useful if an event is part of a group of events that for the most part needs to be configured in the same way.
Tick the necessary checkboxes and choose an event from the dropdown list and press the sync icon (top right).
Tickets sold

|
The menu choice Tickets sold shows how many tickets have been sold of each type. If the event is part of a group of events, all events are shown.
Share the on-screen information with your friends, colleagues …. by pressing the share icon.
Total scans

|
The menu choice Total scans shows how many tickets have been scanned and not-scanned of each ticket type. If the event is part of a group of events, there is a choice to show only the scans of the event or combined from all events in the group.
Share the on-screen information with your friends, colleagues …. by pressing the share icon.
Basic settings
Type
|
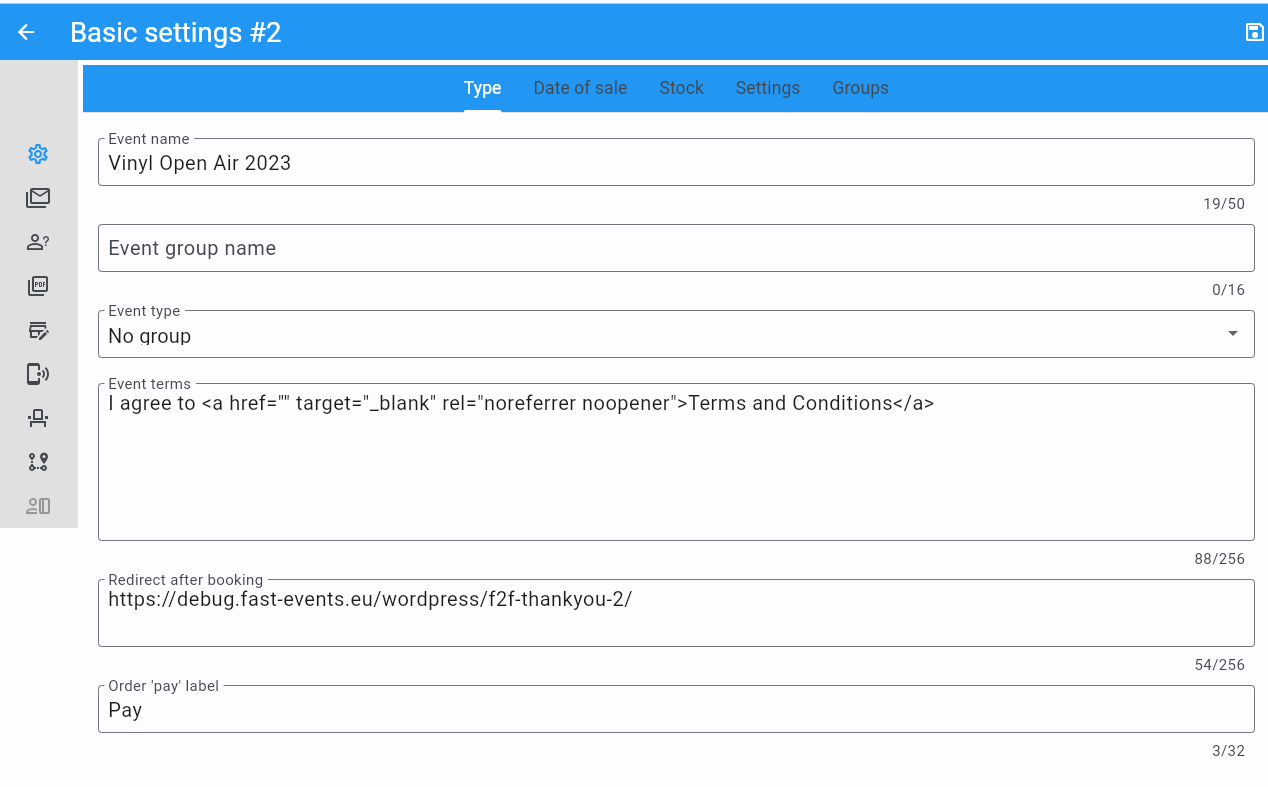
The basics definition of the event.
- Event name
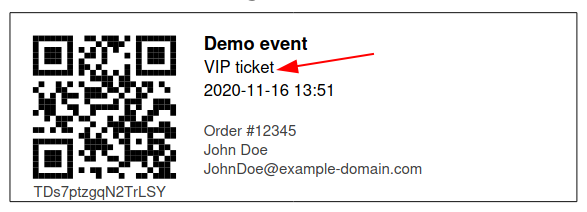
The name of the event (max. 50 characters). This description is used as the first line in the qrcode block.
- Event group
Must be filled in if you choose Select 1 date in group, Select multiple dates or Passe-partout in the next field.
- Event type
Make a selection:
No group: you just have a single event at a particular date and time.
Select 1 date in group: the same event is running at multiple different dates. For example: you are organizing a boat trip on Thursday and Friday; the trip follows the same route on both dates and prices are the same as wel. You need to define 2 events where the date in the
Event typediffers (one on Thursday and the other on Friday). People can choose which tour they want to make during the ordering process. Make sure you fill inEvent group; this ties both events together. Any name will do, f.i. “Boat“.Select multiple dates: a variation on the previous choice. We still have a boat trip on Thursday and Friday and prices for both are still the same, but the route on Thursday differs from the one Friday. During ordering people can either choose to make 1 trip or book both trips on Thursday and Friday. Again: make sure you fill in
Event group; this ties both events together. Any name will do, f.i. “Boat“.Passe-partout: works in conjunction with
Select multiple datesevents. In our previous boat trip example, you could select either to take 1 or 2 boat trips, all for the same price per day. With this option you present the customer a separate page to buy the 2 boat trips for a separate price (usually lower). Buying 1 passe-partout gets you 2 e-tickets in this example. One for every day. Stock control is applied on the targeted events; stock of the Thursday trip and Friday trip is decreased by one if you buy 1 passe-partout. The passe-partout event itself can also have stock control.
- Event terms
If this field is not empty, then this is shown at the bottom of the order page as a checkbox. The user must check this in order to place the order. If you work with links (see screenshot above), always target a new window. Only the following html-tags are allowed:
<a>,<b>,<i>and<u>.- Redirect after booking
The page (‘Thank you‘ page) to which the user will be redirected if the payment/booking has been successfully completed.
- Order ‘pay’ label
The label used for the submit-button in the orderform to submit the order.
After you have made changes, click/tap the save-icon.
Date of sale
|
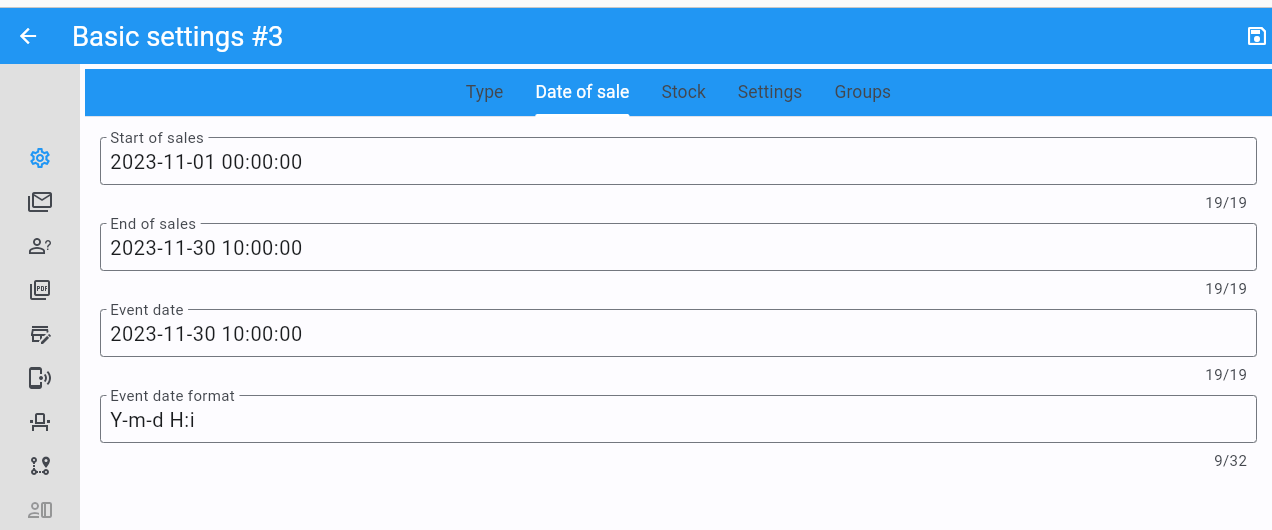
- Start of sale
The ticket sale will start on this date and time.
- End of sale
The ticket sale will end on this date and time.
- Event date
The date and time when the event starts.
- Event date format*
How the event date is formatted in the qrcode block on the e-ticket. The placeholders can be found here.
Stock

|
Quickly change the event stock and ticket type stock.
- Event stock
The number of tickets available for the event. If all tickets are sold, customers will see a sold out message. If you leave this blank or set to zero, there is no limit on the number of tickets to be sold.
- Link stock event-id
Instead of counting the tickets sold for this event, the numbers are also deducted from the stock of another event. Take for example our boat trip example. There are 500 tickets available and they cost € 10,–. But senior citizens only pay € 4,– and you want to reserve 100 tickets for them. Define a separate event for senior citizens with stock set to 100 and let it point to the id of the main event. First it checks it’s own stock, if it’s not blank or ‘0’ and then it checks the linked stock. If you use linked events, the following stock checks are performed:
The stock of the ticket type is checked, if you have defined stock.
The stock at the event level is checked, if you have defined stock.
The stock of the linked event is checked, if you have defined stock.
The stock of the ticket type of the linked event is checked, if the ticket type matches one of the tickets of the linked event and if you have defined stock. Matching the tickets types is case sensitive.
- Tickets
Set the stock of individual ticket types. Leave it empty if there is no limit
Event settings
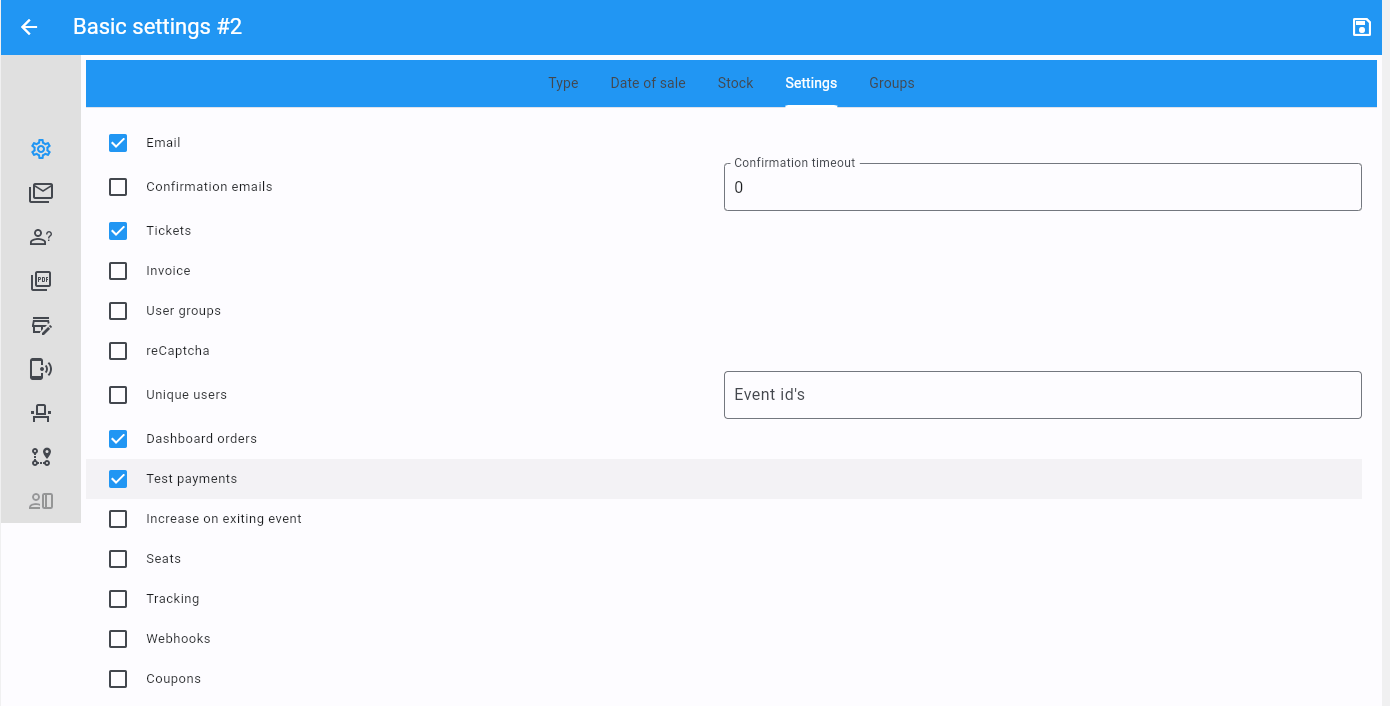
|
Send an email or not. Only makes sense to turn this off at a basic RSVP event or if you have added the shortcode for the download link in the “Thank you” page.
- Confirmation emails
Use this only with RSVP events or events with free tickets. The user must confirm via a link in an email whether he is present. The process flow is:
User makes a booking on booking page
User is redirected to the page you entered in the
Redirect after bookingin the Type tab.User gets the email defined in the Email body tab.
User clicks on the Confirm button in the email
User is redirected to the page you entered in the Redirect input field in the Confirmation address & subject tab and he receives the confirmation email.
In the orders overview the order will show up as
booked - confirmedordashboard - confirmedif they are booked through the FE Admin App of the Orders menu.- Confirmation timeout
This setting works together with Confirmation emails. This field is in minutes. The user must press the confirm link within x minutes otherwise the reservation will be deleted. If you enter
0for this field, the order stays in the system until its confirmed; it wont be deleted automatically.- Tickets
Use or not use tickets. Keep in mind that tickets are never sent, but always have to be downloaded with a link sent by email.
- Invoice
Use or not use invoices. Keep in mind that invoices are never sent, but always have to be downloaded with a link sent by email.
- User groups
Only users who belong to a certain group can place orders. Works together with Groups tab.
- ReCaptcha
Protect your order page against spam with Google ReCaptcha. Make sure you have set the keys in the Settings. Fast Events only supports ReCaptcha v2.
- Unique users
Users can only place 1 order per event. This can also be used across multiple events. See Groups tab. The user is identified by the emailaddress.
- Event id’s
Use this input field if you have checked the Unique users. For a single event there is no need to enter event-id of the current event, as the default is the current event-id. But suppose you have a boat trip on Thursday and another one on Friday. You define 2 separate events and users are only allowed to book on either Thursday or Friday, but not on both dates. Select both event-ids, e.g. “#2,#4”. Mind you, you have to this for both events!
- Dashboard orders
Whether or not the option to place order in the order menu is active. These orders follow all defined logic, but no payments are made.
- Test payments
Use this flag to test your event before the event goes into production.
- Increase on exiting event
If an exit scan is done, stock is increased by 1 if this flag is set. You can compare it with a car park that is full. As soon as a car leaves the car park, there is space for a new car.
- Seats
Use a seating plan. Works together with Seats settings.
- Tracking
Use the FE Tracking App for sporting events in particular to enable participants to signal checkpoints on the route in the App and possibly upload them to the server when they are passed. Works together with Tracking settings.
- Webhooks
Whether or not webhooks are enabled for this event. See also Webhooks
- Coupons
Whether or not coupons are enabled for this event.
Groups
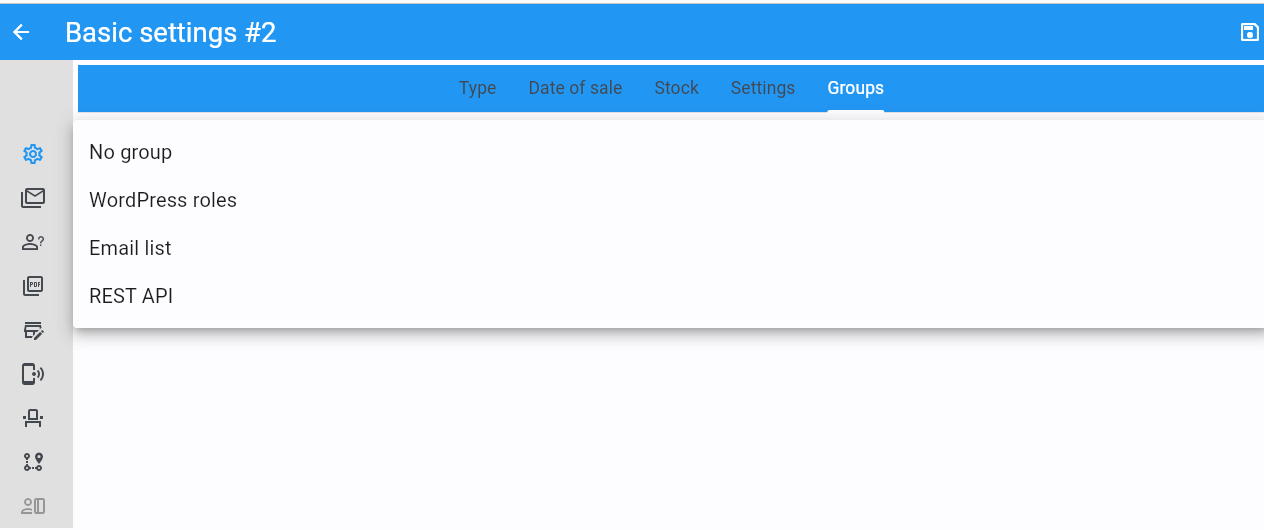
|
This tab allows you to configure that orders can only be placed if customers are members of a group.
Configuring this tab only makes sense if you have checked User groups in the Event settings tab.
WordPress roles
Select the roles you want to allow to place orders from the drop down list. Fast Events will check if the email address entered during the order process matches an existing user in the WordPress database and that the user’s role matches the ones you have enabled. If you have defined a Password field in the Input fields tab, Fast Events will also verify if the password matches with the one stored in de WordPress Database. If you don’t select a role, Fast Events assumes that any role is valid.
Email list
Suppose you want to go on a boat trip and only the members of your football club are allowed to go. Select an email list you have uploaded in Tools -> Email list.
REST API
This is an option to check via a configurable REST URL if an order can be placed and how many tickets can be ordered.
In realtime Fast Events checks via a POST request, content-type application/json and a security key (HTTP Header) .
These are the parameters are included in the body of the HTTP request as a JSON string:
- $attr[‘name’]
(string) The name of the person placing the order.
- $attr[‘email’]
(string) The emailaddress of the person placing the order. This value is read-only.
- $attr[‘order_amount’]
(string) The total order value. For example
6.50. This value is read-only.- $attr[‘order_vat’]
(string) The total order VAT value. For example
2.50. This value is read-only.- $attr[‘fields’]
array of input fields.
‘name’ (string, case sensitive) The name of the input field.
‘value’ (string) The value of the input field.
- $attr[‘tickets’]
array of ticket-types ordered.
‘name’ (string, case sensitive) The name of the ticket-type.
‘price’ (string) The ticket price. Example
6.25.‘vat’ (string) VAT.
‘count’ (int) The number of tickets ordered.
The server should respond with {"count":0} if you are not allowed to place an order.
It is possible to include an error as well. For example: {"count":0,"error":"This user is unknown"}.
This JSON string should be returned in the body of the response. This error-string will be shown to the user.
Make sure you respond with an HTTP status code in the 4xx range.
If the server decides the input is valid it should return the maximum number of tickets this person can buy, eg. {"count":5}
REST API example
1curl https://api.exampledomain.com/search \
2   -X POST \
3   -H 'Accept: application/json' \
4   -H 'Content-Type: application/json' \
5   -H 'X_API_KEY: Hgbsda$ZKKa!4Ix' \
6   -d '{"name":"John Doe","email":"[email protected]","fields":null,"tickets":[{"name":"Silver","price":"7.00","vat":"21.00","count":1}],"order_amount":"7.00","order_vat":"1.21"}'
https://api.exampledomain.com/search is the REST API URL.
The X_API_KEY: Hgbsda$ZKKa!4Ix is the part you have to copy into the HTTP Header field. It’s the secure key between the client and the server.
Warning
If you have defined input-fields, they will be included as well. So password-fields will be visible to the external server. Only use the REST API in this case if you trust this server and/or it is under your control.
Emails
Email body
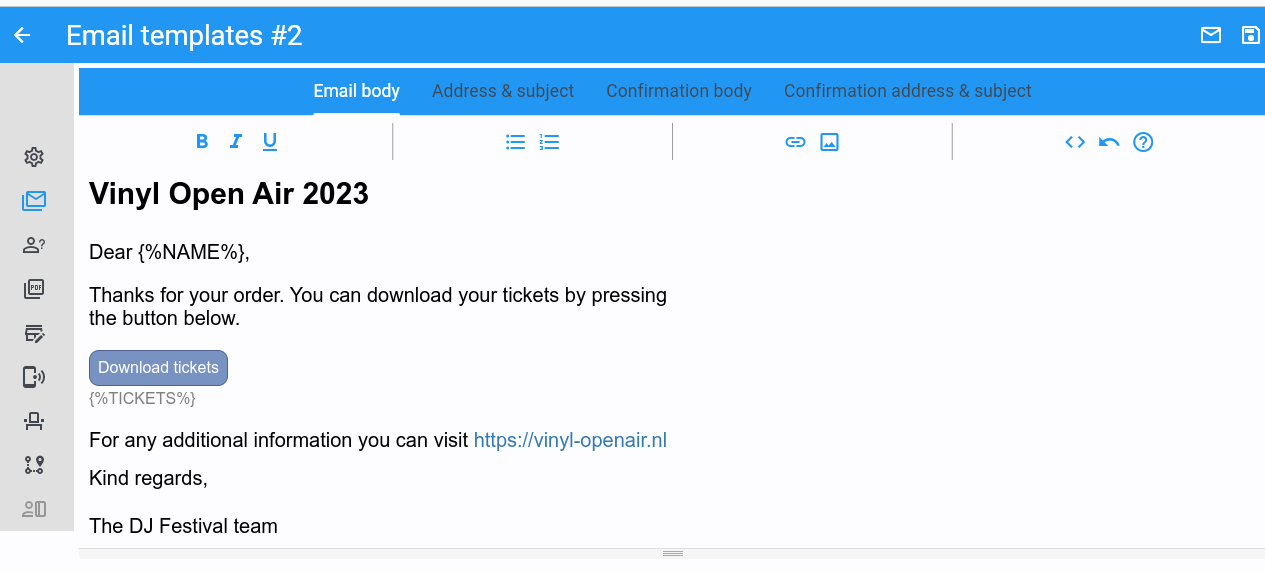
|
This tab defines the email that the user will receive once the order has been placed and paid for.
This email is also used if orders are added in the Orders section by clicking/tapping the +-button.
A smart editor where you can create your own fancy style emails. A word of advice: keep it simple and small and don’t include large images. If you must use images, use links from your own site or a CDN. Remember that the email doesn’t contain the e-tickets, but a link to download them.
You can use a couple of keywords and Fast Events will replace them with the info available in the order:
{%NAME%} is the name of the person who placed the order.
{%EMAIL%} is the email address of the person who placed the order.
{%YEAR%} substitute the current year (YYYY).
{%TICKETS%} the unique link for downloading the e-tickets.
{%DOWNLOAD-TICKETS%} insert the following block with the appropriate links to download the tickets.

{%PERSONALISE%} insert the personalisation link for the tickets. This is the link specified in the
Redirect after bookingfield in the Basic Settings Type tab of the event. It will insert a block similar to the one in {%DOWNLOAD-TICKETS%}.{%INVOICE%} the unique link for downloading the invoice.
{%FIELDS%} the input fields from the input-tab in table format.
{%CONFIRM%} only applicable for RSVP events and if the Confirmation emails flag in the tab has bee set. The link to confirm that you will be present/participate.

Warning
Make sure to URL-escape a keyword if it is included in a hyperlink. E.g. <a href="%7B%25TICKETS%25%7D">Download tickets</a>.
Don’t forget to test your email if it is ‘spam-proof‘. There are many tools available on the Internet, but we recommend using https://www.mail-tester.com/ Click the Send test email button and use the email address on the mail-tester site and within a minute you have detailed report. You should take this very seriously, because if your email gets a high spam rating from receiving domains, your emails may end up in the ‘Spam’ folder, or they won’t be delivered at all. Or worse, your domain may be blacklisted.
Use the envelope-icon to send an example email.
- Deep dive
For the experts: the email itself is embedded in a container that is no wider than 600px. Always test on your mobile first to make sure the email formats well. Don’t include images directly from your camera, which can be several Mb in size. If you must include images, keep the resolution at an acceptable level and use tools such as https://kraken.io to reduce the size.
Fast Events will ‘purify’ the email to prevent XSS-attacks, e.g. scripts are not allowed.
Address & subject
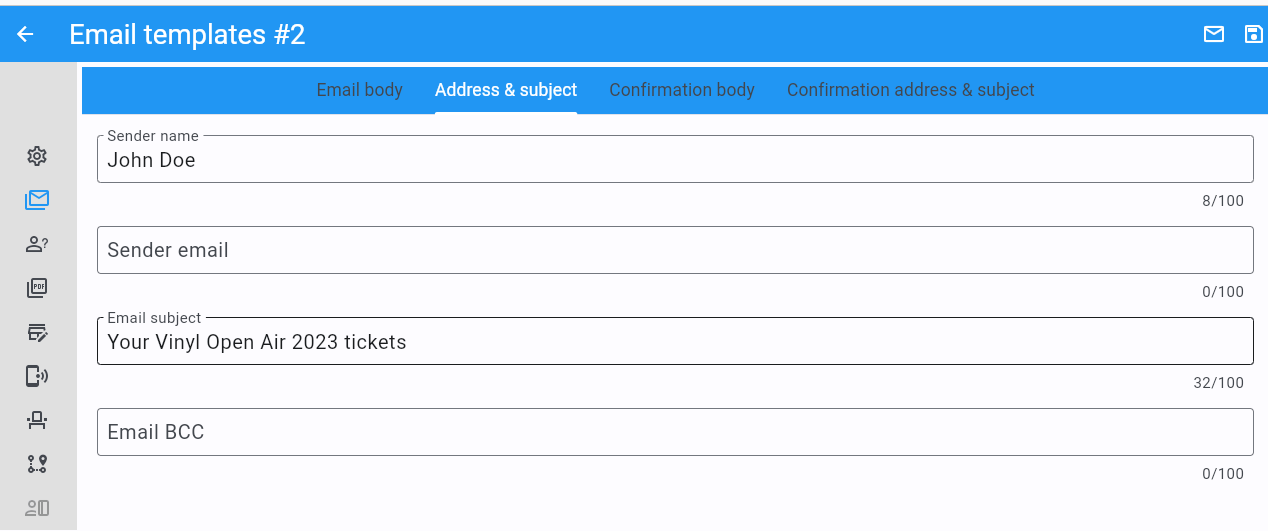
|
- Sender name and sender email
Optional fields. Use it if you want to override the
Sender nameandSender emailin the Email settings.- Sender email
Optional field. Don’t leave it blank.
- Email subject
The subject of the email. Don’t leave it blank.
- Email BCC
There is an option to add only 1 BCC email address
Confirmation body
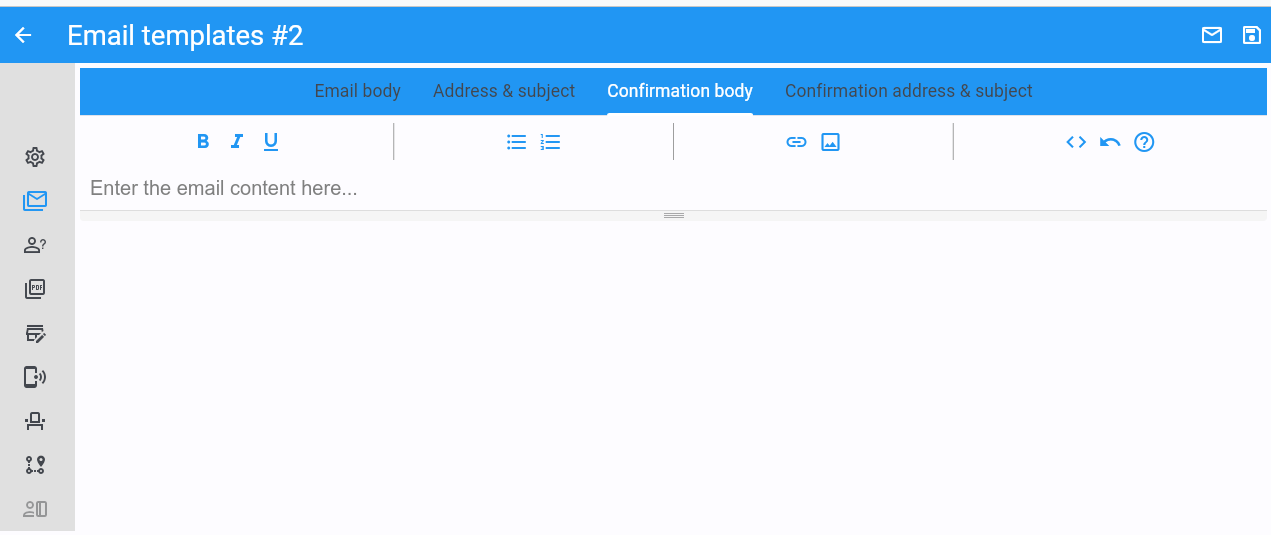
|
This tab is only used if the Confirmation emails flag is set in the Event settings tab and works in combination with the Confirmation timeout field. See Email body for explanation of the keywords.
You usually use this if you have an event with free tickets. In other to prevent that pranksters reserve tickets with bogus emailaddresses they dont own, they will get a confirmation email that needs to be confirmed. If not the order is deleted after a defined timeout.
The process flow is:
User makes a booking on booking page
User is redirected to the page you entered in the Redirect after booking input field in the Type tab
User gets the email defined in the ‘Email – tab‘. Make sure you include the
{%CONFIRM%}keyword in the email. The email should contain something like ‘ … thank you for your booking. Please click the confirmation link below to confirm your presence. This link is valid for 60 minutes …’. This is where the Confirmation timeout field kicks in. Enter a value of 60 (or whatever you prefer); the field is in minutes. If the user doesn’t click the link within 60 minutes, the order/reservation wil be deleted. If you enter0for this field, the order stays in the system until its confirmed; it wont be deleted automatically. You can do ‘t yourself in the Orders menu by sorting on date and delete orders manually.User clicks on the Confirm button in the email
User is redirected to the page you entered in the Redirect input field in the Confirmation address & subject tab and receives the email defined in this tab as well..
In the orders overview the order will show up as booked - confirmed or dashboard - confirmed
if you book it yourself via the Orders menu.
Note
The fast_events_new_order hook will be triggered after the user confirms the order.
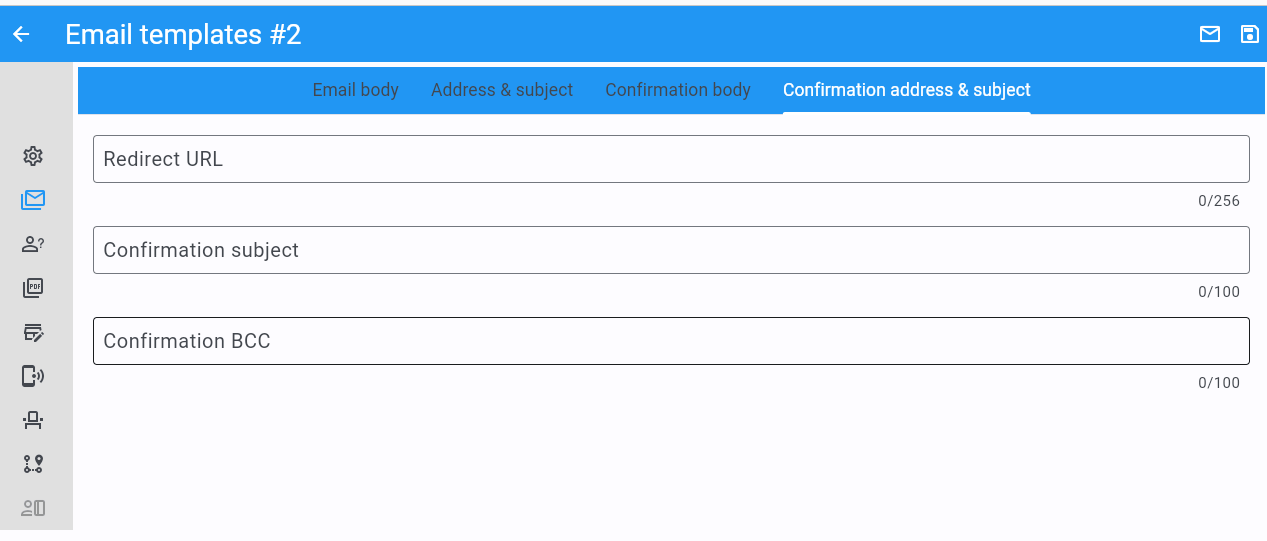
Confirmation address & subject
|
- Redirect URL
The redirect URL the user is send to if he confirms attendance.
- Confirmation subject
The subject of the email. Don’t leave it blank.
- Confirmation BCC
There is an option to add only 1 BCC email address
Input fields

|
Specify the input fields here and tick the Personalise checkbox if required.
If unchecked, the input field will be displayed on the order screen.
If checked, the customer must personalise the tickets after placing the order.
Once all tickets have been personalised, they can be downloaded.
How this works is explained in the Personalisation section of the documentation.
The fields that don’t need to be personalised appear from top to bottom of the order screen.
The value field is optional, except if the type field is Select, then enter the choices separated by a ‘,‘.
Example: the Field description is Color and Value could be something like Black,White,Green,Red.
If the type field is set to Password, the value the user has entered will not be stored in the database. In addition, the password field cannot be personalised and is only used on the order screen. The value is preserved till the filter ‘fast_events_input_fields is executed. Immediate after the filter it’s value is removed.
For most fields a minimum and maximum value can be specified. For the text and password fields, a minimum and maximum length can be specified.
All fields are limited to 50 characters.
You can reorder the fields by dragging them to the correct position.
PDF templates
Upload templates

|
You will only see the templates you own. ‘administrator’ users will see all templates and who owns them.
Preparation
- How to create a template?
Use for example Word, LibreOffice, … and design a single-page A4 e-ticket. Leave a 120 mm x 40 mm block somewhere on the page. You can position it either vertical or horizontal or even in any angle you want. This is the block where Fast Events will print the qrcode block and some other information.
Save the design as PDF and upload it here.
- Recommendations
Keep the PDF as small as possible, preferable below 200kb for a single eticket. Don’t use full blown images. Bring them back to an acceptable resolution. And pull them first through sites like https://kraken.io to squeeze the size. An image resolution of 150 DPI for etickets is enough. Make use of use the pdf system fonts. For example use for your text the
Helveticafont. Try to prevent the use of special fonts, because these are embedded in the PDF and then the PDF becomes larger. You can analyse your PDF here.
Warning
Do not use online tools to compress PDF files, because Fast Events does not fully support all compression methods. It’s best not to use compression.
Example ticket
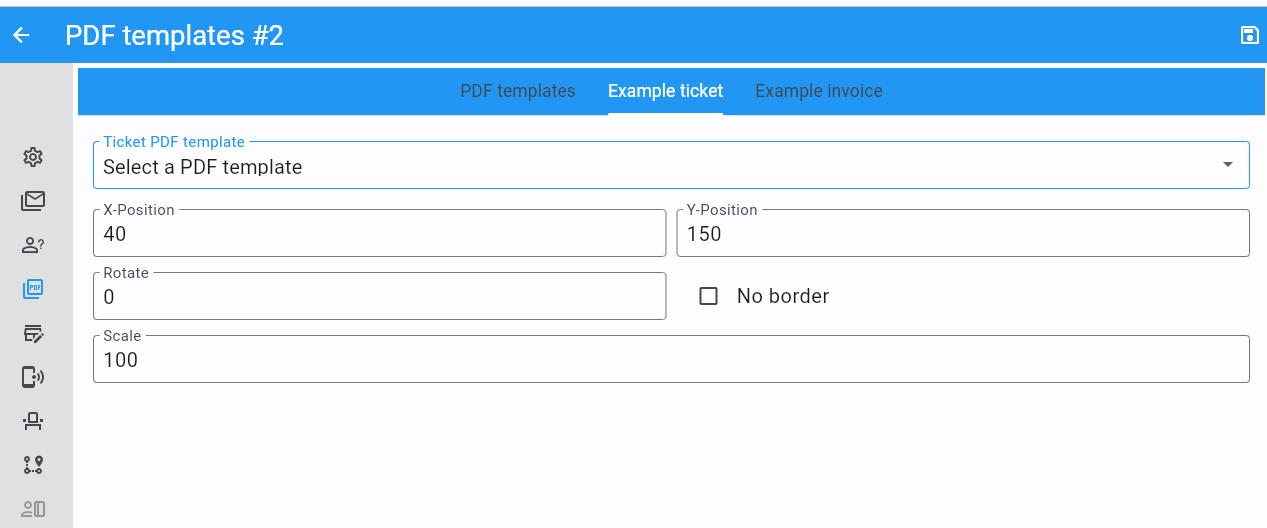
|
The size of the eticket is always A4 (210mm x 297mm) and so the X-position and Y-position values must stay within these limits.
The values of these fields are in millimetres.
Pick a template from the dropdown box and start playing with the X-position and Y-position to position the qrcode block.
Click on the PDF-icon to see the result. Repeat this step until you are satisfied with the positioning.
With the Rotate field you can rotate the qrcode block. Rotation is done from the top left corner and must be between 0 and 360.
Scale is a percentage that can be used to scale the qrcode block. The default value is 100.
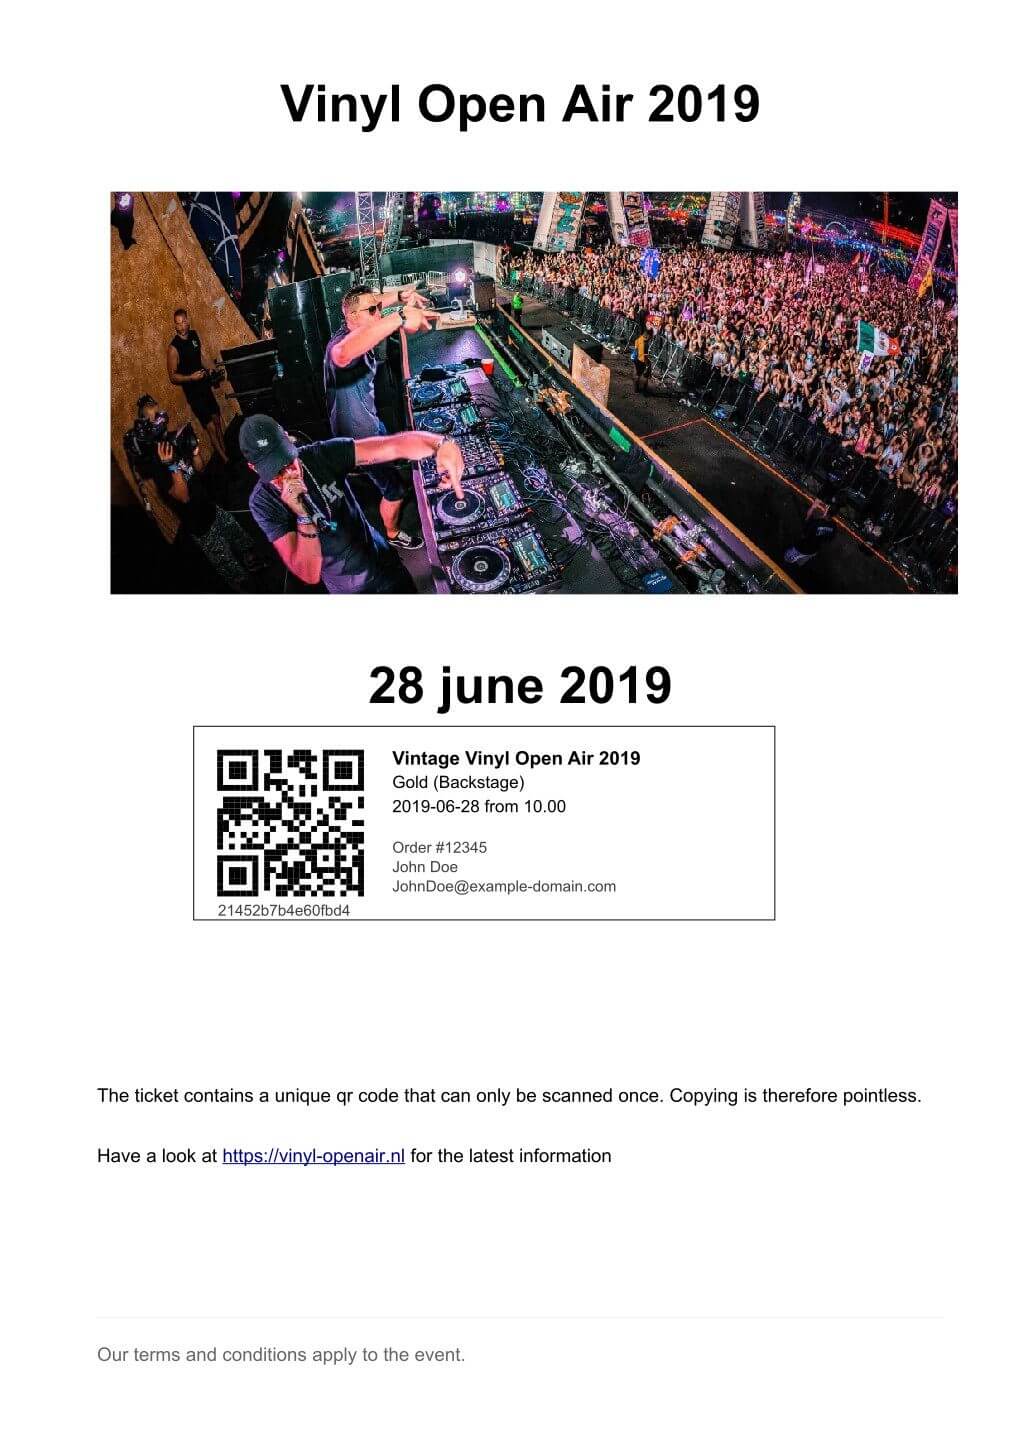
Look at the example template and the ticket example
if the settings of the screenshot above have been applied.
- No border
If checked, no border is printed around the qrcode block.
Once you are happy with the positioning save the values.
Invoice example
|
|
The preparations for the invoice template are the same as the one for the tickets template. Look at the invoice template and the invoice example if the settings of the screenshot above have been applied.
This is certainly not an official invoice, but more a proof of purchase. For official invoices, it is better to link Fast Events with an accounting package. You can do that, for example, by using the fast_events_new_order webhook. Look here for an example.
Ticket types
|
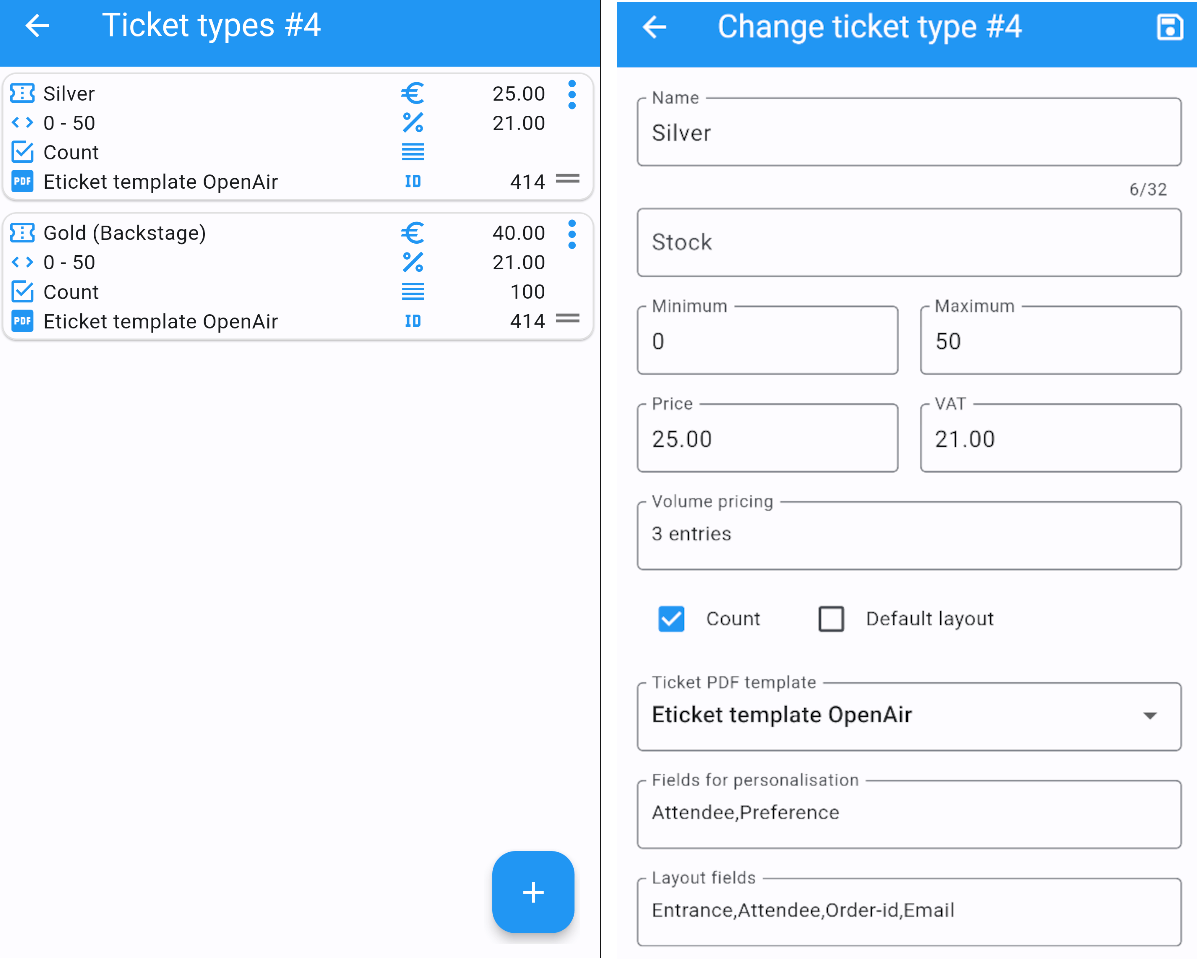
Add the tickets you want to sell. Duplicate ticket types are not allowed. The tickets are shown in the order form in the order they appear here. You can reorder tickets by dragging it to the new location. If the Count is checked, then the purchased quantity is deducted from the stock at the event level as defined in the Stock tab. The Price field includes VAT.
If you leave the stock field empty, you can keep selling tickets until you reach the maximum you have defined at the event level.
In the above configuration only 100 Gold (Backstage) tickets can be sold and there is no limit for the Silver tickets until it reaches the maximum defined at the event level.
It can happen that all tickets are sold out, but only 50 Gold (Backstage) tickets are sold.
If you want 100 Gold (Backstage) tickets to be guaranteed, you will also have to limit the number of Silver tickets.
Together, they must add up to the number defined at the event level.
If a ticket is sold out, it will still show up in the orderpage, but you can’t select it and it is flagged as sold out.
Click on the Volume pricing field if you want to use volume pricing.
For example: from 3 tickets the price is 30 each, from 6 tickets the price is 25 each, etc….
In the follow-up screen, you can enter or delete the numbers and prices.
If volume pricing is available for a ticket type, a + will appear next to the ticket type on the order form for the user to click on to view the pricing.
Attach a PDF template to the ticket by selecting one from the Ticket PDF template dropdown box. You can attach different PDF templates for each ticket type, but the QR code block must always be in the same position on the template.
If you have defined personalisation fields in the input fields, you can select them in Fields for personalisation. They will appear in the Personalisation dialog in the order you select them. You can drag and drop them to change the order.
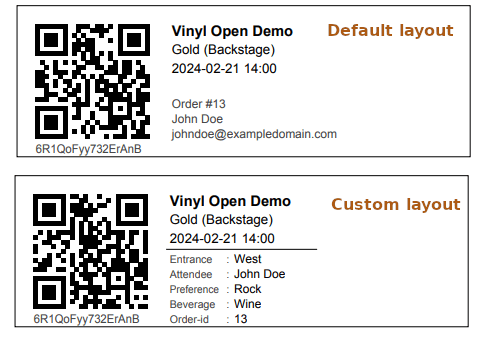
|
The QR code info block on the eTicket will look like the first example if you check the Default layout checkbox. If unchecked, you can select up to 6 fields in the QR Code info block, by tapping the Layout fields box. They will appear in the QR Code info block in the order you select them. You can drag and drop them to change the order.
Ticking the show remaining tickets checkbox, will display the remaining tickets in the order form. Keep in mind, however, that this is a snapshot. Once the order form has been compiled, other users may have placed orders, resulting in fewer tickets being available.
Warning
Never add or remove ticket-types if orders already have been accepted.
Note
If you want to give free parking tickets to all participants and want to check them at the entrance of the parking lot,
you can for example define the following ticket.
Define a new tickets: set Ticket description to Parking ticket, Price is 0, Min
is 1, Max is 1 and Count is No.
Scan keys
|
Preparation
Scanning tickets can be easily defined in this screen.
Varying from a single scan for all types (level 0) of tickets to a stepped scan (level 1) for selected ticket types.
For example, visitors must first be scanned at the main entrance before they can be scanned at the backstage entrance and only if they have a Gold (Backstage) ticket.
You can temporarily leave the event (e.g. to smoke) and return a little later using levels 7 (Temporarily leave) and 8 (Re-enter).
It’s also possible to reset (level 6) a ticket, as explained in this example.
You can also include an exit scan (level 9). Once a user passes this scan, no other scans are possible anymore.
Scanning is done with the mobile scan app, so no need for expensive scan equipment.
Configure the scan app by pressing Qrcode in the popupmenu and scan it in the app settings and you are ready to scan.
If needed you can show the users the App install link by pressing the Android or IOS buttons. Let them scan it with
the camera so the App can be installed.
Double clicking/tapping on a card or line brings you straight to the configuration Qrcode, if you have no edit rights on the scan keys. If you have edit rights it brings you to the edit screen.
Or share the qrcode so the Scan App user can scan the image to configure the App.
Note
Scan keys and locations must be unique per event, but you can use the same scan keys and/or locations across events.
Examples
- 1. One event with a single entrance
Just define a single scankey and give Location a name.
- 2. One event with multiple entrances
You would like to know how many visitors arrive at each entrance. Define different scan keys for each entry. Set Location to the name of the entries. In the
Toolssection you can download a csv-file of the scanned tickets and subsequently do some data-analysis. Another option is to use the fast_event_scan_ticket event and monitor in realtime how many people did pass the different entrances.- 3. Multiple events grouped together
It’s basically 1 single event, but you are selling tickets per boarding place for a boat trip. Per event (boarding place) you define an unique scankey. Give the Location a name.
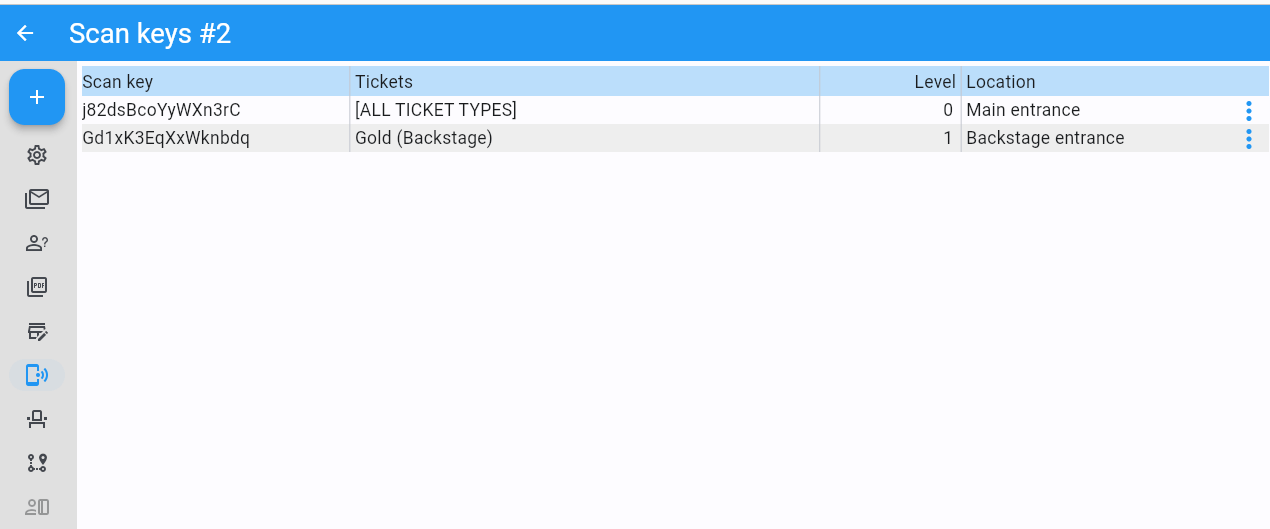
- 4. A single event with regular tickets and tickets with backstage rights
See the screenshot above. There is a scankey for all tickets for the main entrance and a separate scankey for the
Gold (Backstage)ticket with the level set toLevel scan. This means that before you can scan a backstage ticket it must have been scanned at the main entrance. If you have multiple ticket types that are allowed to go backstage, just select them in Tickets. Mind you: make sure the name of the ticket matches one (or more) ticket types you have defined in the Ticket types overview. The fields are case sensitive.- 5. Addition on 4. Backstage visitors can also pickup a free cocktail
The same definition as example 4, but just add 1 unique scankey for the
Gold (Backstage)ticket, the level should be set toLevel scanand give it a name/location (“Free cocktail”).- 6. Repeated access to a sports facility
The idea behind this is that members enter through a regular entrance scan, and at the exit a reset scan is performed. This allows members to go back inside again. For non‑members a normal exit scan is carried out, after which the ticket becomes invalid. This behavior can be controlled in the fast_events_scan_reset_filter action filter.
- 7. Cycling tour with several checkpoints
Make a
Entry scanat the beginning of the tour and a scan key (Level scan) for each checkpoint. Optionally, you can do aExit scanat the end of the tour and, for example, give the participants a medal when they have completed all the checkpoints. The latter is easy to check in the Scan App.
Seats
|
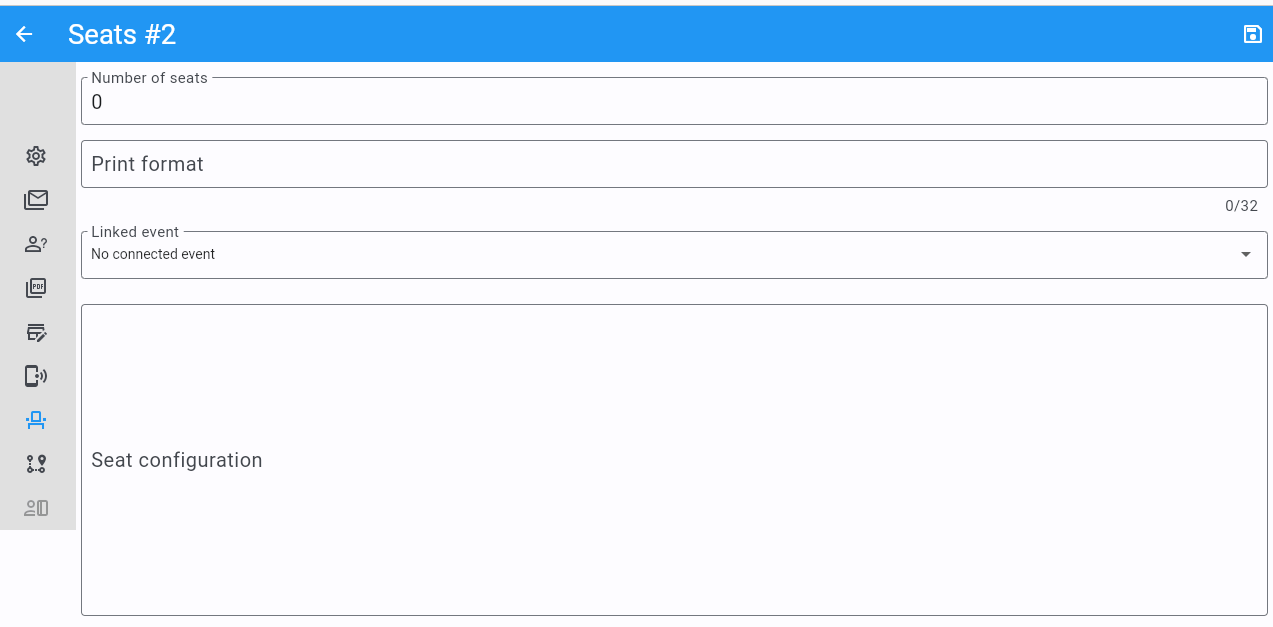
In this tab you can configure the seating for the event. Configuring this tab only makes sense if you have checked Seats in the Event settings overview.
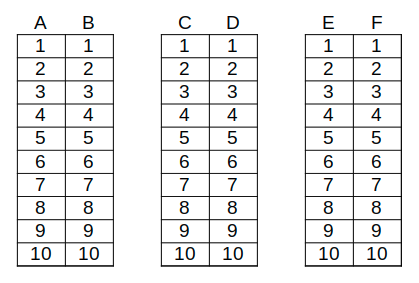
In this example we are working with 60 seats and the seats are filled in the order A1, B1, A2, B2, … C10, D10, C9, D9, … E1, F1, E2, F2,…
Example seating plan |
Position seat information |
- Number of seats
The total number of seats.
- Print format
The seating module of Fast Events works with 2 variables, the row, which can be any string, but in this example we use “A, B, C, D, E and F” as row identifiers. The second parameter is a number. The numbers dont have to be sequential. They also do not have to start with 1. The seating info is printed in the qrcode-block just after the ticket-type. Suppose you want the string to look like “Gold (Backstage), row A table 09”. The print format must then be
, row %s table %'02d. The format comes from the printf-function.- Seats configuration
The format is
row:seatFrom-seatTo,row:seatFrom-seatTo,.... So in our example is must be A:1-1,B:1-1,A:2-2,B:2-2. The total number of seats must match the configuration you specify here. It can of course be a lot of work to enter such a seating order, especially if you have hundreds or more. For these cases we suggest you goto https://sandbox.onlinephpfunctions.com/ and use the following code:1<?php 2for ($i=1; $i<=10;$i++) { 3 echo "A:$i-$i,B:$i-$i,"; 4} 5for ($i=10; $i>0;$i--) { 6 echo "C:$i-$i,D:$i-$i,"; 7} 8for ($i=1; $i<=10;$i++) { 9 echo "E:$i-$i,F:$i-$i,"; 10}
Grab the output and paste it here. Done!
But of course there can be seat configurations that are a lot simpler.
Suppose you fill the seats sequential per row. The configuration is then A:1-10,B:1-10,C:1-10,D:1-10,E:1-10,F:1-10.
- Linked event
Use the event with this id for the seatingplan.
Tracking
The essence of Tracking is simple. Suppose you have a sports event in which the participants have to follow a mapped out route and scattered along the route are a number of checkpoints where you have to show your eticket and have it scanned. At the end of the route your eticket is scanned again and when you have passed all checkpoints you will receive a medal or other proof of participation.
To make this possible, event organisers would normally have people at each checkpoint who scan the participants’ tickets and possibly at the start to gain access to the event. This in itself is perfectly possible. Define a level 0 scan (=entrance), per checkpoint a level 1 scan and at the end a level 9 scan.
There are, of course, quite sophisticated solutions available on the market, but they all require an investment in hardware and/or software, or participants must purchase Apps or a combination of these.
The Fast Events WordPress plugin offers a standard solution with a tracking App that participants can download for free for Android and IOS. The App allows participants to track their progress along the route, and checkpoints are automatically flagged by the App and will be uploaded to the organisation’s server, where they are handled as if they were a scan of the ticket. This means that checkpoints do not need to be manned, in fact they can be completely virtual. That is, they are only known to the App by their geographical coordinates.
In addition, it is also possible to use real-time track updates and send real-time news messages to all users of the FE Tracking App for this event.
Step-by-step implementation
Enable the Tracking flag in the Event settings tab.
Define KML-files to describe the track, including the checkpoints and any other points of interest you want to show in the App. Ech KML-file can only contain a single track, if for instance you have an event with multiple distances. In the KML-file the order of the layers is fixed:
The track layer is always first
The checkpoints layer
0 or more layers, where every layer has similar points of interest
Upload ALL KML-files by pressing the Upload KML file(s) button in this tab. You can’t upload them one-by-one or delete one.
Fill in the remaining fields in this tab.
Inform participants how to use the FE Tracking App. This could be in the email that participants receive when they have ordered a ticket or on a webpage that is prominently displayed on the website.
KML files
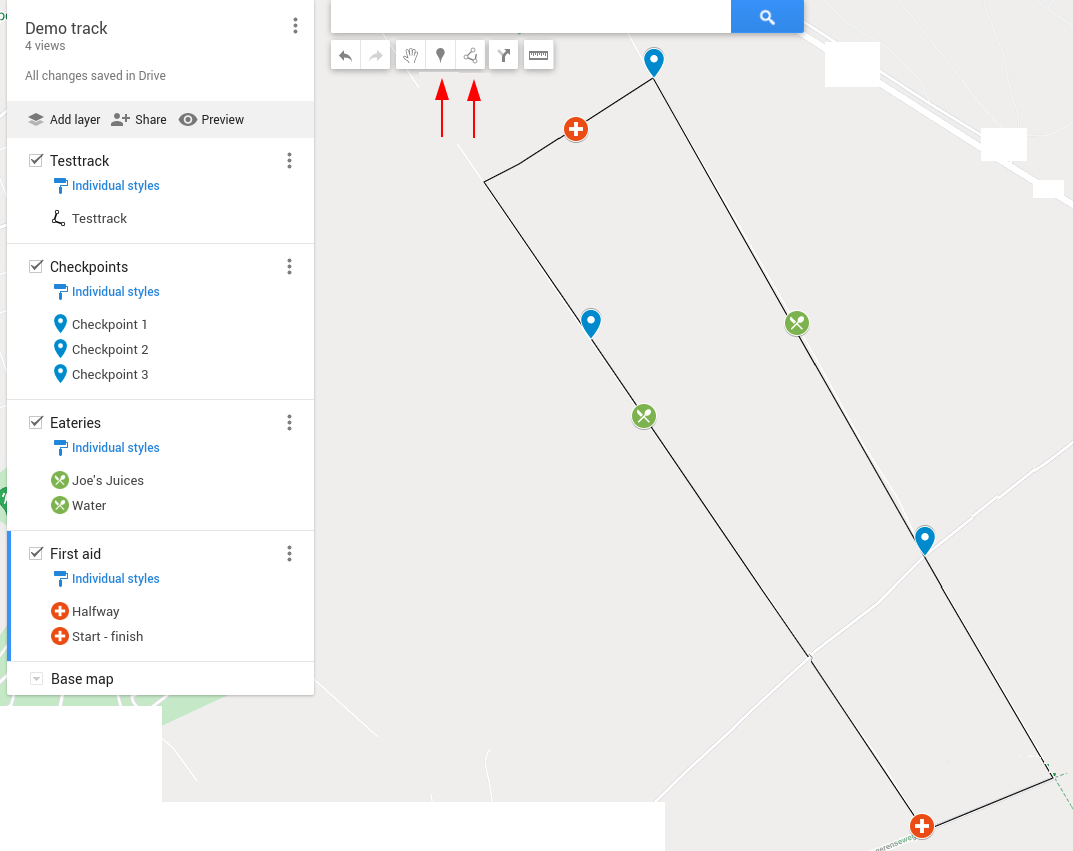
Fast Events uses KML-files created by Google My Maps. You will need a free Google account for this. If your event has only a single distance, you need to create ofcourse 1 KML file. If you have multiple distances you need to create a KML file for every distance. Every KML files contains the track, the checkpoints and other points of interest grouped by layer for every type of point of interest. Draw the route in the direction it will be walked, cycled, driven, etc. Always start at the beginning! Zoom in as much as possible to make the track as accurate as possible.
In case of multiple distances, the user can choose the distance in the App. However, if the name of the track in the KML file is the same as the name of the ticket that the user has purchased, then this KML file is automatically selected by the App without the user having a choice.
In the App the user can scan the eticket if it has been printed or search the PDF for a valid qrcode if it is stored on the phone. In case of multiple etickets in the PDF the user will be asked which page needs to be search for the qrcode.
Here is an example:
|
You can only define a single path! And as show in the example every layer with similar points of interests are grouped together and all need to have the same icon and color.
|
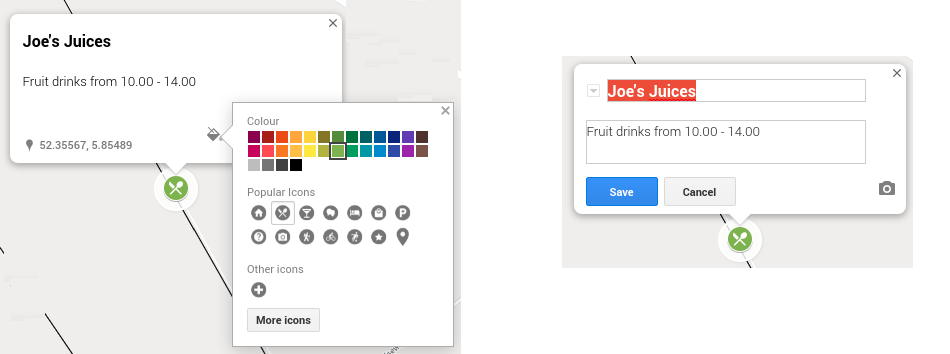
For every point of interest in the layers you have to use a short descriptive name. The description can contain as much text as you like. You can’t use your own icons; always use one of the embedded Google My Maps icons.
Warning
Each checkpoint must be linked to a scan entry in the Scan keys overview. The link is via the location field. So make sure the name of the checkpoint is exactly the same as a location field.
The Checkpoints-layer needs to be the first layer after the track.

|
This is how the dialogues will look like on the phone.
Export the KML file
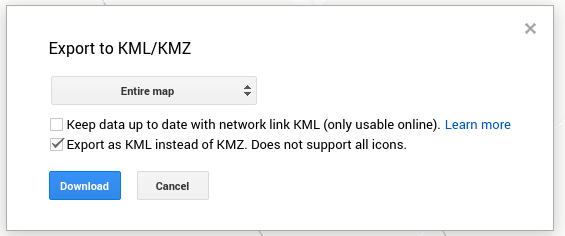
|
Tip
If you need to create multiple Maps which include mostly the same points of interest, create the first Map and export it as KML file. Create a new Map and import the previous exported KML file and make the changes you need.
Remaining fields
- Tracking window
Between these 2 times the participant can enable recording in de FE Tracking App and it will register when checkpoints are passed. Outside these windows all information (POI’s and record track) is still visible, but recording is not possible.
- Geofence radius
The radius of the circle around a checkpoint. Once the mobile enters a checkpoint-circle, the checkpoint is flagged as passed. The minimum radius is 200 meters. Make sure you position the checkpoint very accurately on the Map by zooming in as much as possible.
- Distance filter
The FE Tracking App is optimized for battery-efficiency. It samples the accelerometer periodically while tracking in order to power-down the GPS as soon as the device is determined to be stationary. It uses the distance filter to query for the GPS location. But the filter itself is elastic; the faster you go, the larger the distance filter becomes. And ofcourse the other way around. The default value is 10 meters. But keep in mind that for walking 10 meters would be a good start, for cycling you would be better of to the start with 25 meters.
- No entry scan
Suppose you have a cycle tour with several starting points on the route and you do not want to do an access scan so that the participants can start immediately. Then tick this checkbox. If a checkpoint upload is done from the FE Tracking App, an entry scan is done automatically if it has not already been done. Under the hood Fast Events does a level 0 scan with the same location name (=Checkpoint name) prepended with an asterix (*).
- Force Tracking App
Level 0 and level 1 checkpoints (= scan location!) can only be uploaded by the Tracking App, you can’t scan them with the Scan App. The level 9 scan can be scanned by the Scan App, but please note that it has to be the ‘Finish/end qrcode’ found in the main screen of the overview of all routes.
- Information URL
This is where you should put your dynamic information. The user can click this URL from within the FE Tracking App. If you expect a lot of traffic, consider a CDN in front of your site or use something like Amazon Amplify, which is free the first year.
- Emergency number
The phone number users should call in case of emergencies. This phone number is visible in the FE Tracking App.
- Help text tab
Put here the static information what the rules are to call the number.
Warnings
Never change the tracking field in the Event settings tab while the event is running.
Never change the scan fields in the Scan keys tab while the event is running.
Participants can download tickets in the FE Tracking App until the end of the tracking window. Except, of course, if the ticket, the order or the event has been deleted earlier.
Participants should keep their qrcodes on the eticket for themselves. Each time the ticket is downloaded into the FE Tracking App a new unique signature will be generated. This means that the last person is the
ownerof the ticket. Previous downloads (by others or on a different phone) cannot upload checkpoints any more from the FE Tracking App and the final scan will also fail. So keep the eticket qrcode secret!
Saas
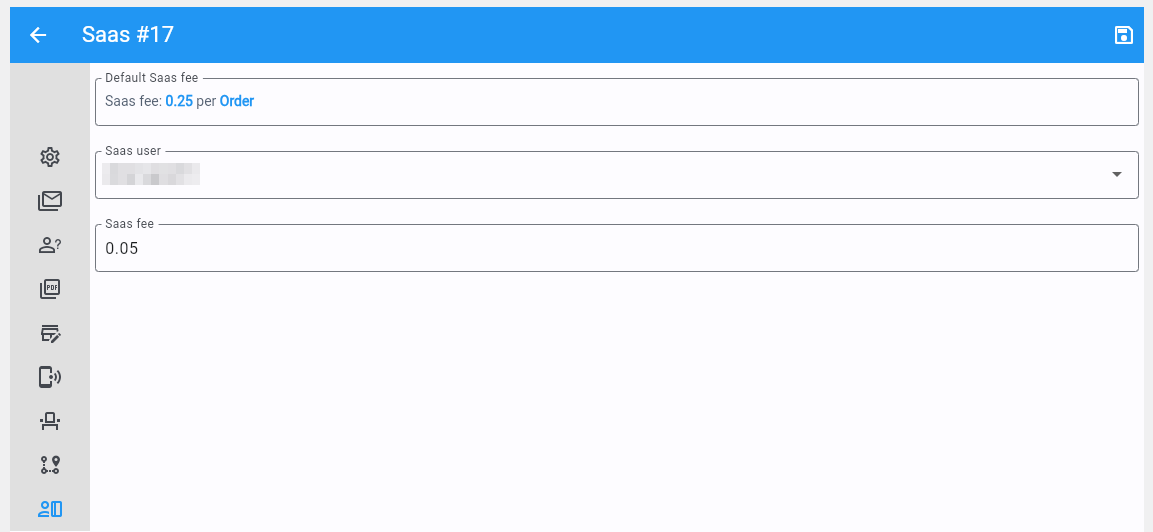
|
This tab is only available for ‘administrator’ users.
- SaaS user
Select the user this event is assigned to. If you don’t select a user, the system will use the default Mollie keys as defined in the settings and will not operate in Saas-mode for this event. If the system is not running in
SaaS modethis entry can be ignored.- SaaS fee
If not empty it overrides the saas fee specified in the Payment provider settings. Leave empty if you want to use the value in the settings.
Totals order status
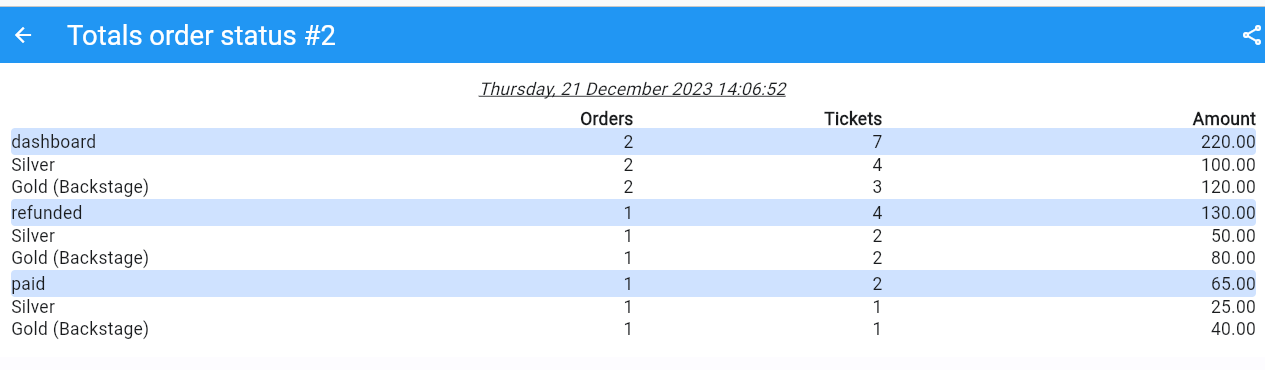
|
An overview of the totals per order status. If this even tis part of a group you can show just the order status totals of the event or the totals of all group members.
Duplicate event
If you need to create a group of events that are all related to each other, it’s usually more convenient to fully configure one event first, then duplicate that event and adjust the small differences.
Delete all orders
Make sure you have a backup before you delete all orders from an event.
Pay close attention to the order of deletion when you want to delete the orders of multiple events consecutively.
If you have related events (a group) with a passe-partout event, you must first delete the orders of the passe-partout event and only then delete those of the other events in the group.
For linked events, the orders of the linked event must be deleted last.
Delete event
For deleting events, the same rules apply as for deleting all orders.