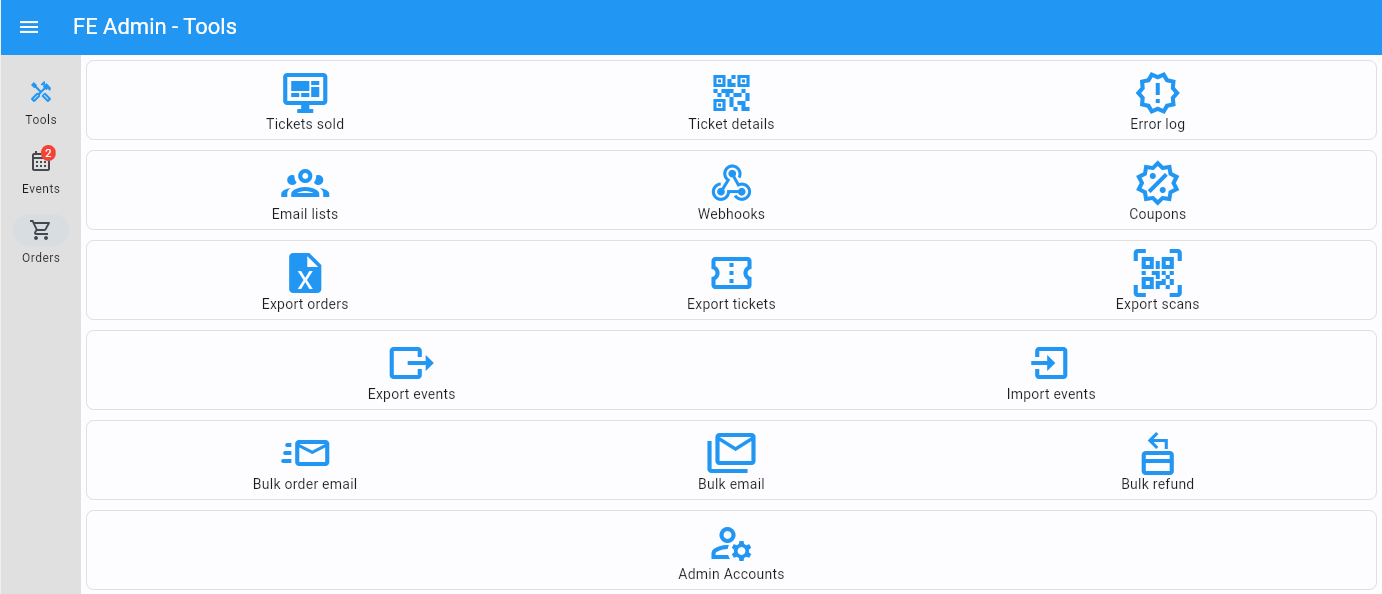
Tools
|
All available tools.
Tickets sold
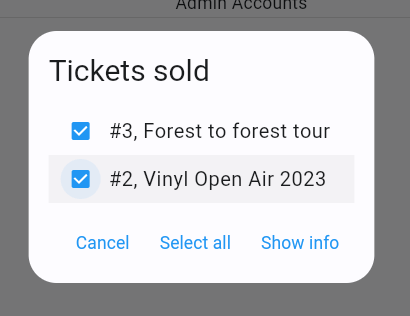
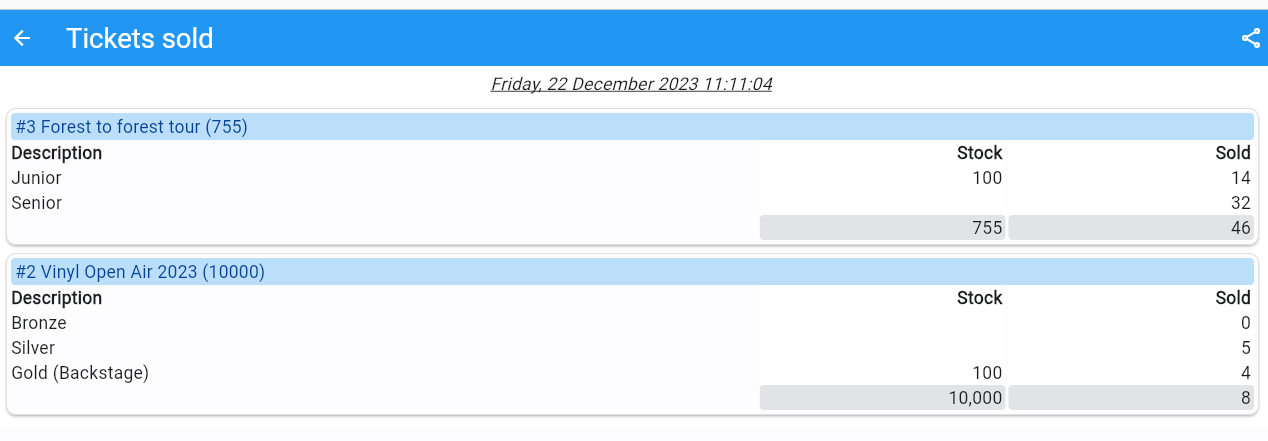
First select the events you want to see in the overview.
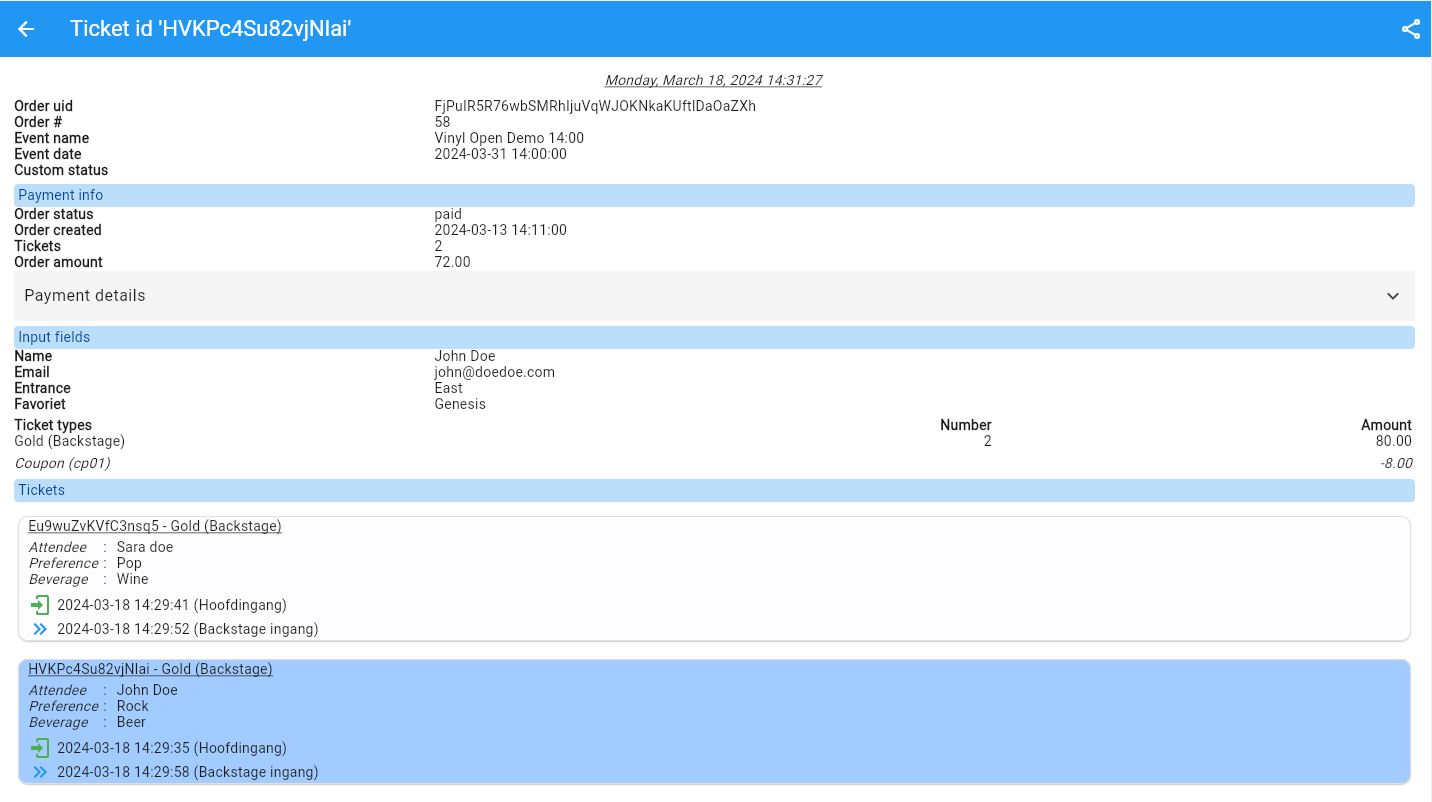
Ticket details
|
This is an information scan. The order overview will show all tickets and all scans. The scans of this ticket will be visible with a different colour.
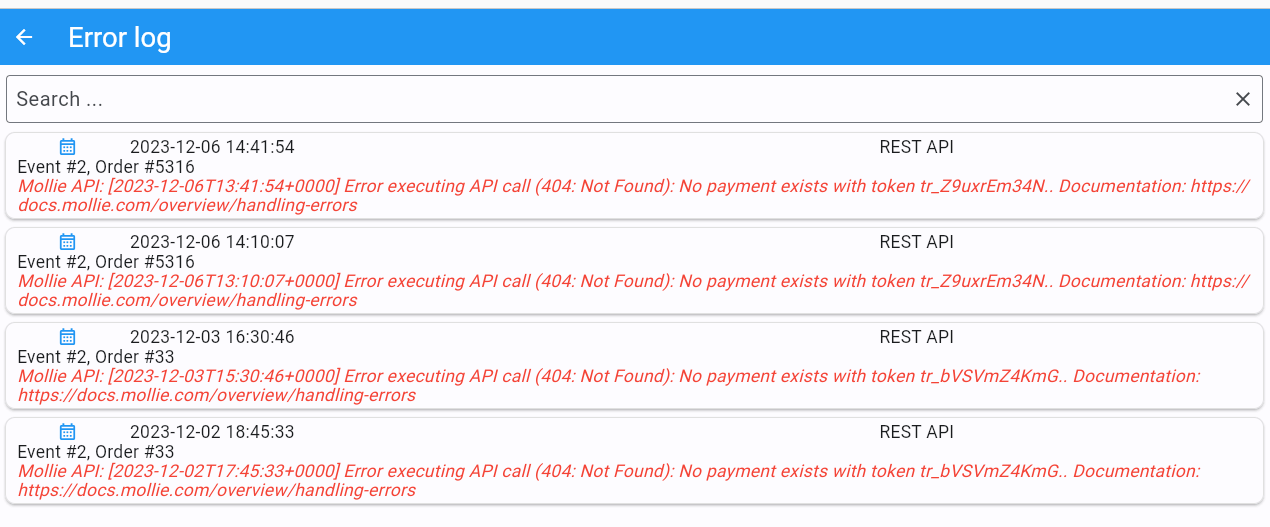
Error log
|
This menu option shows you all errors from the last 30 days. Errors older than a month are automatically removed. Errors are truncated in the overview. Click/tap on the card to see it in full. Swipe the card left or right to delete the error.
Most messages are not generated by Fast Events but by the underlying email provider, payment provider or database provider. But in most cases the errors are pretty self-explanatory.
In the event of errors, it is wise to review the web server logs as well to assess how the error originated.
Email lists

|
Upload a CSV (comma seperated file) and link it to an event. The file should contain a name, emailaddress and number.
The number is the maximum number of tickets the user can buy. Emaillists work together with Groups.
You need to set the Group type to Email list for the event to make use of the email list.
It is possible to overwrite the email list. Existing email addresses are then overwritten and new ones are added. However, no email addresses are deleted.
Note
Make sure that the fields are separated by a ; and that the fields are embedded in ".
Webhooks
See Webhooks
Coupons
Coupons can be used in two different ways, either a single coupon is defined and can be used by all users or personalised coupons with a unique code associated with each individual email address.
However, both approaches use the same coupon constraints. you can define a number of constraints:
Usage limit the maximum number of times the coupon can be used.
Usage limit per user the maximum number of times a specific user (based on email address) can use the coupon.
Start date the coupon is valid from this date.
End date the coupon is valid until this date.
Events the coupon can only be used by the specified events (comma separated list of event ids). If empty all events are allowed.
Tickets the coupon can only be used by the specified ticket types (comma separated list of ticket types). If empty all ticket types are allowed.
Minimum # tickets the minimum number of tickets required for the coupon. If empty there is no minimum.
Maximum # tickets the maximum number of tickets allowed for the coupon. If empty there is no maximum.
Minimum amount the minimum amount required for the coupon. If empty there is no minimum.
Maximum amount the maximum amount allowed for the coupon. If empty there is no maximum.
Email address the coupon can only be used by this email address. If it is empty, anyone can use it.
The coupon type can be defined as fixed if a fixed amount is to be deducted from the total, or percent if a percentage is to be deducted from the total.
Note
Note that if you use percent and limit the scope of the coupon to certain ticket types, the percentage will only be applied to those ticket types.
Usage
Enable the coupon-setting at the event level to use coupons for the specified event. You will now be able to enter a coupon code on the order form. Coupon codes can only be entered in the orderform if all mandatory fields (input fields, number of tickets) have been completed. Once the coupon html block is used, the input fields cannot be edited. When the coupon block is collapsed, editing is possible again.
Single coupon
Using a single coupon is simple: define a coupon with the restrictions that suit your needs and tell (email, webpage, orderform, …) your customers how to use it.
Single coupon emaillist
If you have an emaillist associated with an event it is possible to send a bulk email to all members of that list via the menu choice
Bulk emails from the coupon menu. In this menu, you must specify a coupon that will be used as the template for the email.
The keywords used in the email will be replaced with the information from the coupon.
Personalised coupons
The idea behind this approach is that everyone receives a unique coupon code, which often can be used once. You should take the following steps to generate all these coupons:
Create a coupon that can act as template for the unique coupons. For example:
Promo.Use the Generate coupons choice of the template coupon context menu.
Enter how many coupons should be generated. If necessary, use a prefix and/or suffix for the code. For example a prefix like
Promo-.A csv-file is generated with all the coupons.
You can now add emailaddresses to this csv-file in any way you prefer.
Use the Import coupons from the
couponmenu to import the new csv-file - including the emailaddresses - into Fast Events.Use the Bulk emails from the
couponmenu to send everyone the unique coupon code. You can change the email body and the used keywords will be replaced with the information from the coupon. SelectCouponsas source and, if needed, specify other selection parameters. If you selectUser groupsas source, an email is send to all users in the user group (= emaillist). All the users will receive the same coupon code, which you need to specify in the Coupon code template field.
Export orders
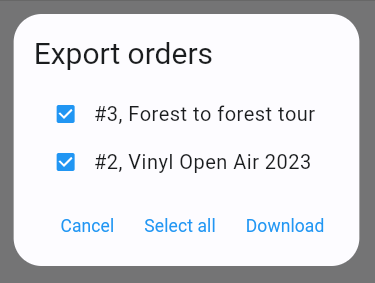
Select the events from which to download all orders. The file will be downloaded in .csv format.
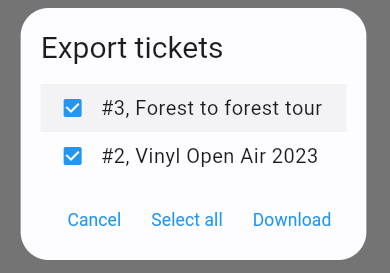
Export tickets
Select the events from which to download all tickets. The file will be downloaded in .csv format.
Export scans
Select the events from which to download all scans. The file will be downloaded in .csv format.
Shortcodes

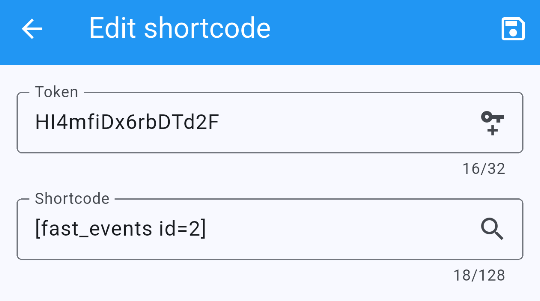
Shortcodes work closely together with the ordering API. Define the token IDs that can be used in the ordering API. Make sure the token IDs are not traceable, preferably containing a random string, so that inventive users cannot search for other events on the platform.
Note
The Shortcode tool can only be used by WordPress administrator accounts.
Export events
This tool is only available to administrator users.
Select the events, media files (pdf ticket- and invoice-templates) and web-pages that needs to be included in the zip-file.
Import events
This tool is only available to administrator users.
Select the import zip-file and specify if you want to overwrite media files and/or web-pages.
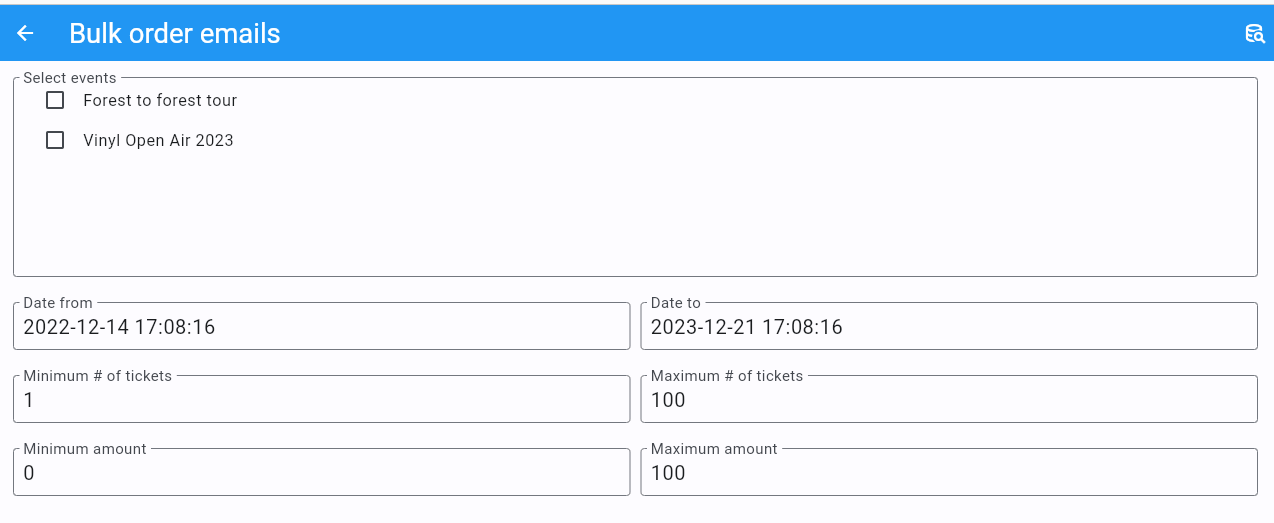
Bulk order email
|
During normal operations there should not be a need to send order emails as they are emailed automatically after the customer has paid for the order. But maybe the email that automatically got send did contain a serious fault or omission, or if your email-system or email-provider wasn’t available for a period of time. Well than this tool might be handy. Make sure you make the necessary adjustments and off you go.
All conditions in the fields below are included in the selection.
After you click Bulk order email, the system will show a dialog. After all the fields are filled in, you can press the database search icon and a follow-up screen will come up with the number of order selected. Press Start to process the orders.
A progress bar will keep you informed on the progress. Don’t close the window until the bar has reached 100%.
- Select events
You can selected multiple events.
- Order between dates
Click on the grayed out date and click on the first date and click on the last date. The orders between these date-times are processed.
- # Tickets between
Only orders with the number of tickets between these values are processed.
- Amount between
Only order amounts between these values are processed.
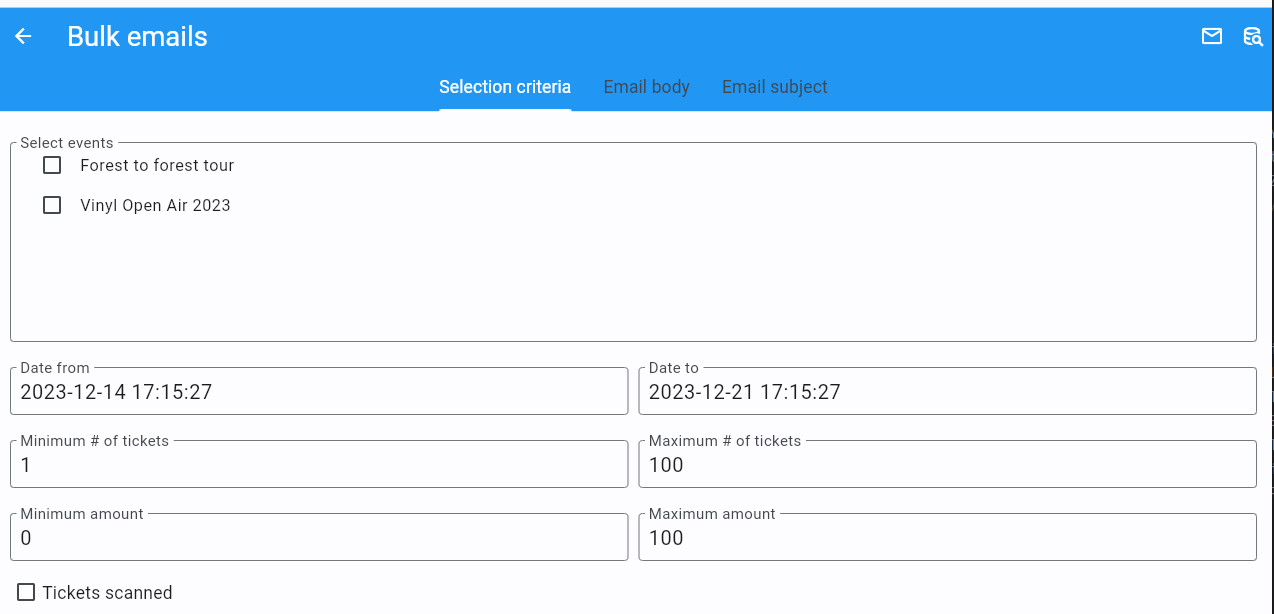
Bulk mail
|
Use the Bulk mail option to send e-mails to customers who have placed orders and all the conditions in the fields below have been met.
After you click Bulk email, the system will show a dialog. After all the fields are filled in, you can press the database search icon and a follow-up screen will come up with the number of order selected. A progress bar will keep you informed on the progress. Don’t close the window until the bar has reached 100%.
- Select events
You can selected multiple events by using the CTRL-key together with the mouse.
- Order between dates
Click on the grayed out date and click on the first date and click on the last date. The orders between these date-times are processed.
- # Tickets between
Only orders with the number of tickets between these values are processed.
- Amount between
Only order amounts between these values are processed.
- Tickets scanned
Only orders with 1 or more tickets that have been scanned are processed.
- Email subject
Don’t leave the mail subject empty
- Email body
A smart editor where you can create your own fancy styled email. A word of advice: keep it simple and small and don’t pull in large images. If you still have the desire to use images, use links from your own site or a CDN.
You can use a couple of keywords and Fast Events will replace them with the info available in the order:
{%NAME%} is the name of the person who placed the order.
{%EMAIL%} is the email address of the person who placed the order.
{%YEAR%} substitute the current year (YYYY).
{%TICKETS%} the unique link for downloading the e-tickets.
{%DOWNLOAD-TICKETS%} insert the following block with the appropriate links to download the tickets.

{%PERSONALISE%} insert the personalisation link for the tickets.
{%INVOICE%} the unique link for downloading the invoice.
{%FIELDS%} the input fields from the input fields in table format.
{%CONFIRM%} only applicable for RSVP events (no e-tickets). The link to confirm that you will be present.

Don’t forget to test your email if it is ‘spam-proof‘. There are many tools available on the Internet, but we recommend using https://www.mail-tester.com/ Click the Send test email button and use the email address on the mail-tester site and within a minute you have detailed report. Be pretty serious about this, because if your email gets a high spam rating from receiving domains, your mails may end up in ‘Spam‘ folders or won’t be delivered at all. Or worse, your domain can be blacklisted.
- Deep dive
For the experts: the email itself is embedded in a container of maximum 600px wide. Always test on your mobile first if the email formats well. Don’t include images straight from your camera, which can be several Mb’s. If you want to include images, keep the resolution at an acceptable level and pull the image through tools like https://kraken.io to squeeze the size.
Fast Events will ‘purify’ the email to prevent XSS-attacks, e.g. scripts are not allowed.
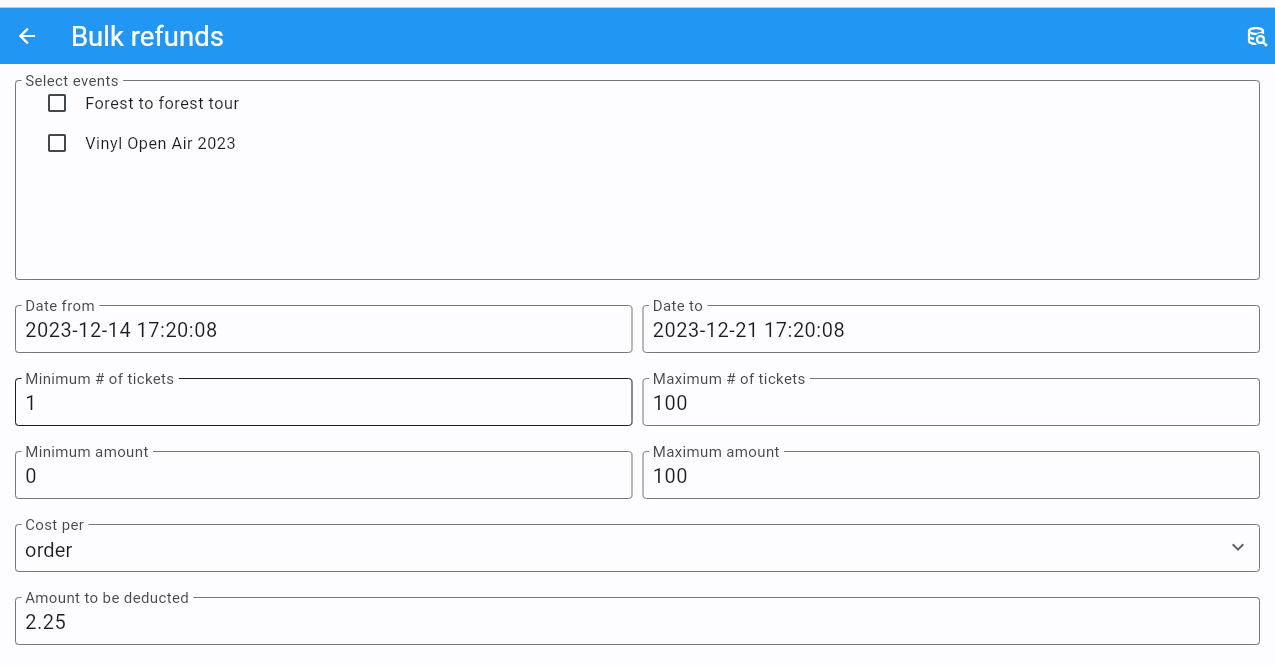
Bulk refund
|
If you want to refund a single order, use the ‘Orders‘ menu. This tool is of use if for instance you have to cancel your event and you want to refund the costs. There is an option to withhold a fixed amount per order or ticket.
After you click Bulk refund, the system will show a dialog. After all the fields are filled in, you can press the database search icon and a follow-up screen will come up with the number of order selected. A progress bar will keep you informed on the progress. Don’t close the window until the bar has reached 100%.
- Select events
You can selected multiple events by using the CTRL-key together with the mouse.
- Order between dates
Click on the grayed out date and click on the first date and click on the last date. The orders between these date-times are processed.
- # Tickets between
Only orders with the number of tickets between these values are processed.
- Amount between
Only order amounts between these values are processed.
- Costs per
Calculate the fixed deduction per
orderor perticket.- Cost
The deduction costs per order or per ticket.
Admin accounts
See how regular accounts can be configured here.
Example usage
Here are a few examples of how accounts can be used for different purposes.
In the examples, we show in each case which permissions need to be turned on to limit the functionality of the FE Admin App to only the desired features.
There a 3 permission groups: Events, Orders and Tools. If the relevant group is not mentioned, it means that all permissions are off.
And of course, the number of visible events can also be limited while adding/changing an account in the Authorised events tab.
- Sales overview
An account where it is only possible to see how many tickets have been sold.
Events:
Read eventsandSales dashboardTools:
Sales dashboard
- Customer support
While ordering, there will always be customers who enter the wrong email address or that the email does not arrive. Someone can then provide support (by phone, chat,…) and verify the request and resend or send the emails to another email address. Customer details can also be changed.
Orders:
Read orders,Show order details,Show detailed payment information,Resend email order confirmation,Edit customer detailsandRead order log entries
- Scan management
Someone is responsible for configuring scan keys and configuring the Scan App of those who are at the various locations to scan tickets.
Events::
Read events,Total scans,Show ticket types,Show scan keysandChange scan keys
Accounts or sub-accounts
Of course, you can create separate accounts for each type of account, and at the WordPress level, that translates into multiple users. Each user then has their own login name, API key and Application Password. Configuring it is a bit more work, as each user needs to get their own configuration qrcode to configure the FE Admin App.
But there is also another approach by using sub-accounts. First, configure an account in which all permissions required by the sub-accounts are turned on. Then define the sub-accounts and turn on only the permissions that are needed and, if necessary, limit the visible events. At the WordPress level, only 1 user is visible. All sub-accounts share the same login name and API key and thus can all use the same configuration qrcode to configure the FE Admin App. However, the sub-accounts all have a different Application Password.
Preferably use sub-accounts if the Fast Events plugin is configured in Saas mode.