Overview
Make sure you have your free Mollie, Stripe, or PayPal account configured. Without it, you can only use RSVP events or sell free etickets (0.00 amount).


To use Fast Events, a one-time configuration is required. To do this, go to the settings of the plugin.
The settings can only be changed by an account with WordPress administrator rights.
This plugin allows you to sell tickets for different types of events. Per event there are all kinds of possibilities to impose restrictions such as, time of sale, maximum number of tickets that can be purchased, group membership, purchase once, limit ticket type stock and much more. A few examples
online sale of etickets for a single event
sell etickets for a group of events. The user can only choose a single event
sell etickets for a group of events. The user can select multiple events
sell a passe-partout. Customers may attend all events in the group
use it for a bicycle tour with multiple checkpoints for scanning and use the FE Tracking App
sell tickets for a theater and use a seating plan
Have look at the detailed examples to get an idea what type of event you can create.
Checklist for creating an event
Before you start creating an event, it is a good idea to go through the questions in the checklist below and collect the answers before creating the event.
The name of the event.
The exact date and perhaps the starting time
When will the ticket sale start and when will it end?
How many tickets are available (stock on event level)?
Do you need multiple ticket types? Eg. a tickets for adults and a ticket for children, each with a different price and stock. Do they need to be counted (Deducted from the stock)?
How many tickets can be ordered in a single order?
Do you want to use volume pricing?
Do you need extra input fields when placing an order?
Do tickets need to be personalized using specific required fields?
Are users allowed to place multiple orders?
Do you need a seating plan?
Is this an sports event and do you want to use the FE Tracking App ?
Is it a single event or are there multiple events eg. 1 event per day for a series of days?
Do you need an passe-partout (access to all events for a reduced price)?
Are there different access-rights for some tickets. Eg. all tickets are scanned at the main-entrance but some ticket types (fi. Backstage) have ‘Backstage’ access and can be scanned at the Backstage-entrance. Or for sports events, a scan at the start of the route, several scans along the route as checkpoints and a scan at the end.
Design the email the user receives after a successful order (see example)?
Create a “Thank you for your purchase” page (See thank you example below).
Do you need more information from the user during ordering. Normally only the name and emailaddress are needed. Be very careful adding too many fields, as users tend to bailout if they see a huge list of mandatory fields.
Design your eticket. Do you need different designs per ticket type?
Scanning of the etickets: are multiple entries used and do you want to measure how many pass a specific entry?
Do you want to give free tickets to, for example, sponsors?
PDF etickets
Customers will receive an email containing a unique link that lets them download their e‑tickets as a PDF file. You need to create a PDF template that the plugin can use to generate the e‑ticket. This is an example of a template.
How to create a template?
Use for example Word, LibreOffice, … and design a single-page A4 e-ticket. Leave a 120 mm x 40 mm block somewhere on the page. Smaller is possible as you can scale the qrcode-block. You can position it either vertical or horizontal or even in any angle you want. This is the block where Fast Events will print the qrcode block and some other information. Save the design as PDF and upload it to your WordPress Media library.
Recommendations
Keep the PDF as small as possible, preferable below 200kb for a single eticket. Don’t use full blown images.
Bring them back to an acceptable resolution. And pull the images first through sites like https://kraken.io to squeeze the size.
An image resolution of 150 DPI for etickets is enough.
Make use of use the PDF system fonts.
For example use for your text the Helvetica font. Try to prevent the use of special fonts, because these are embedded in the PDF and then the PDF becomes larger.
You can analyse your PDF here.
Thank you page
An example “Thank you for the purchase” page |
Download link
It is possible to include a download link for the etickets on the “Thank you” page. You can either combine this with the confirmation email or skip the email altogether (See Event settings, Emails checkbox). Place the download link anywhere on the “Thank you” page using the following shortcode:
[fe_download showimage="yes" downloadtext="Download eticket(s)"]
You can customize the hyperlink text by setting the downloadtext parameter. The showimage parameter is only applicable if there is a single (1) eticket.
If you set it to “yes” , the qrcode wil be included in the page. This can be useful, for example, for the sale of consumption coins.
You purchase the coins on your mobile device, then display the QR code on the “Thank you” page at the counter. The QR code can be scanned directly, and you’ll receive your coins instantly.
No queuing at the counter or time‑consuming payment steps are required. If more than one e‑ticket is issued, this parameter is ignored.
Don’t use this shortcode together with the Event type Select multiple dates.
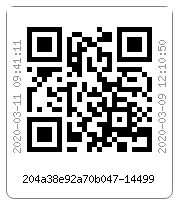
This is an example qrcode. At the bottom the ticket-id and after the dash the order-id. On the right the date and time the order was created and on the left the date (and time the page was created.
Order pages

Once you have defined your event(s), you should create one or more order pages, depending on your requirements. If you just have a single event, use the shortcode-format as shown in the example. The id is the number of the event.
[fast_events id=2]
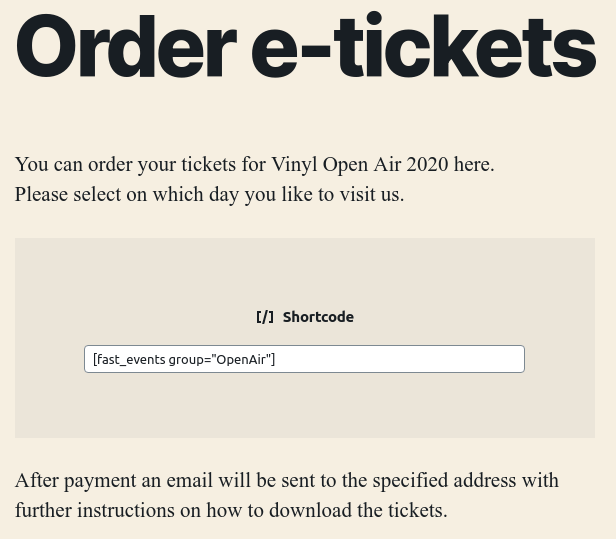
Or use this shortcode-format. Your OpenAir festivals is running for 2 days and visitors can attend 1 or more days. You need to create an event for every day, which are linked together by the group name.
[fast_events group="OpenAir"]
See Event type in the Type settings for more explanation.
Next steps
Goto the orders menu and add via de the dashboard a new order. Make sure you have Dashboard orders switched on in the Event settings of the event.
Check if the email arrives and if the content is ok.
Download the eticket and check it.
Use the Scan App to scan the eticket.
Check in the Orders popupmenu the order details if the ticket is scanned. You can remove the scan with the
Checkinmenu choice in the popupmenu.Now test the orderpage. Make sure you have Test payments switched on in the Event settings of the event.
Check again the email, eticket and scan the eticket.
Do a refund of the last order.
Check the stock value.
If you are happy with the results, you should remove all orders and tickets via the contextmenu in the events menu and uncheck Test payments in the Event settings of the event.
Your event is now live.
If you have a sports event, you can switch on the Tracking in the Event settings of the event and configure the other tracking fields.
Don’t
Once your event(s) has orders you, never change the following fields:
don’t add, remove or change ticket names in the Ticket types. You can change the price and stock.
don’t change the Link stock event-id field in the Stock settings.
don’t change Event type or Event group name in the Type settings. You may change
Dateand/orDate format.don’t add, remove or change extra input fields in the Input fields
don’t change Scan key, Level and Scan location in the Scan keys
don’t change User groups in Groups
don’t change the Seat configuration in Seats. You can add at the end new seats, but you should never remove seats.